Commvault

Aging and Pruning Process

Quick Links to Topics:


The data aging and pruning process starts at 12:00 PM (noon) by default. Jobs that have exceeded their retention settings in the storage policy copy are marked as aged. For disk storage that does not use Commvault deduplication, the jobs are deleted from the disk. Disk storage that uses Commvault deduplication has a micro pruning process to physically delete unneeded blocks. For jobs located on tape media, no pruning process is performed.

Data Aging for Tape Media

Data is aged on tape media at the job level. As each job is aged, it will appear greyed out when viewing contents of the tape. Once all jobs are marked aged, the tape is placed back into its respective scratch group. All jobs on the tape can still be recovered until the tape is overwritten.

If aged data must be destroyed, the tape can be marked as erased by using the following options:

  • Quick Erase – Overwrites the On-Media Label (OML) header on the tape.
  • Full Erase – Completely overwrite all data on the tape.


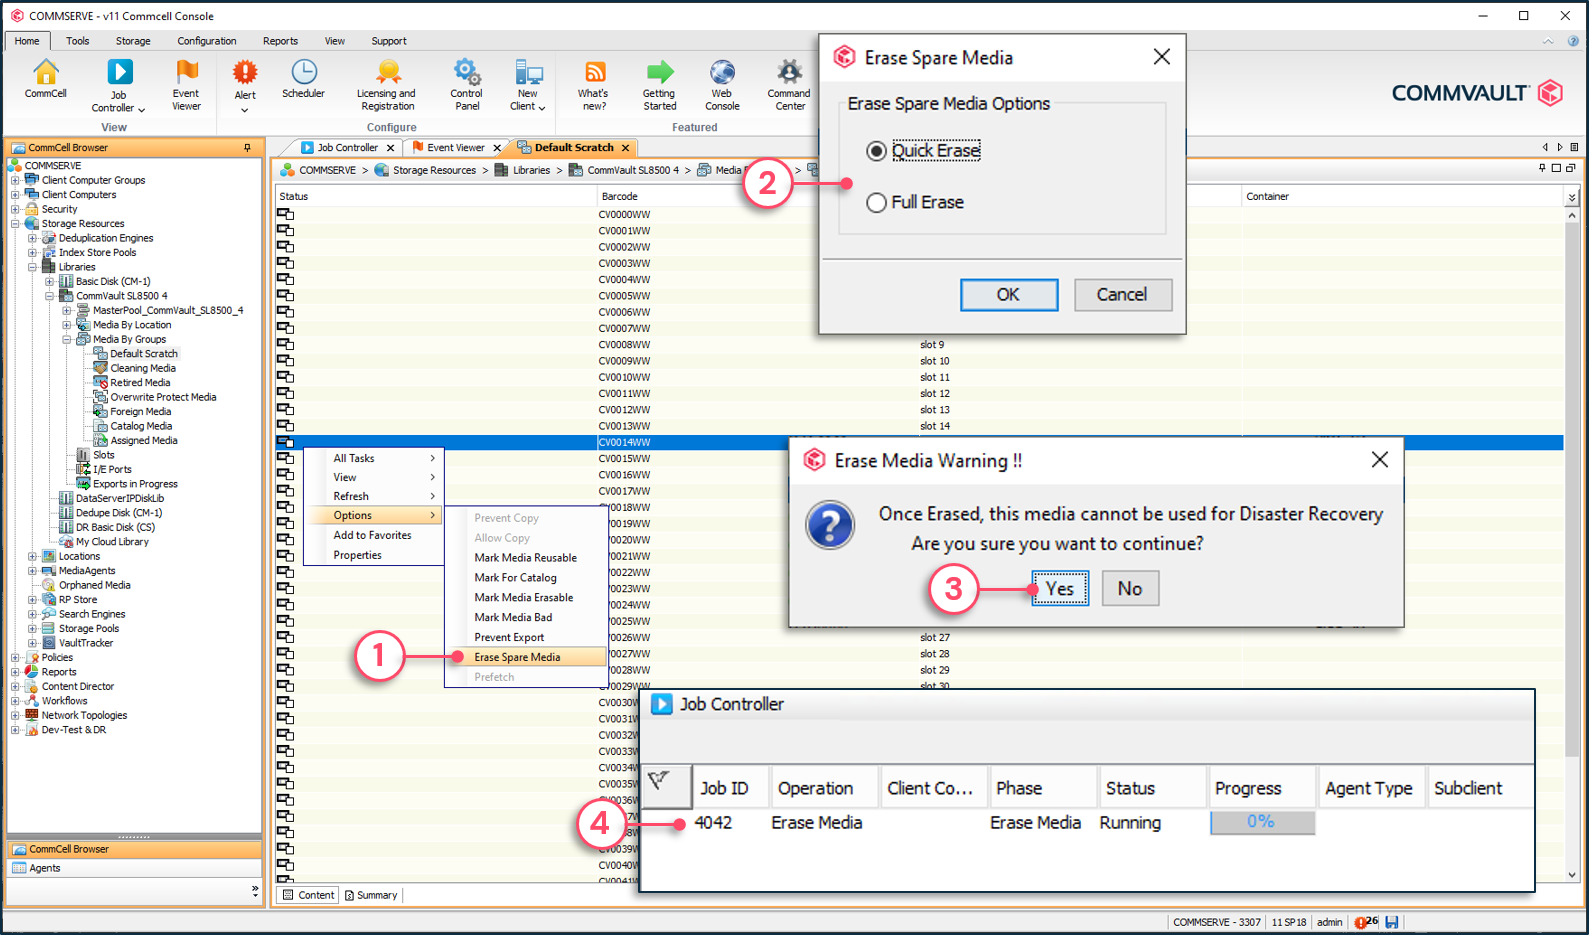
To physically erase a tape

1 - Right-click tape | Options | Erase Spare Media.

2 - Select Quick or Full Erase.

3 - Confirm the operation.

4 - Erase media operations will appear in the Job Controller.


Data Aging and Pruning for Non-Deduplication Disk Storage

Non-deduplicated disk storage is aged and pruned from storage at the job level. Once the job is pruned, it cannot be recovered using Commvault® software.

Note: The managed disk space option is used to keep aged jobs on disk storage for a longer period of time.


Data Aging and Pruning of Deduplicated Data

Data aging is a logical operation that compares what is in protected storage with defined retention settings. Jobs that have exceeded retention are logically marked as aged. Jobs can also be manually marked as aged by the Commvault® administrator. Aged jobs are registered in the MMDeletedAF table in the CommServe® database.

Pruning is the process of physically deleting data from disk storage. During normal data aging operations, all chunks related to an aged job are marked as aged and pruned from disk. With Commvault deduplication, data blocks within SFILES can be referenced by multiple jobs. If the entire SFILE was pruned, jobs referencing blocks within the SFILE would not be recoverable. Commvault software uses a different mechanism when performing pruning operations for deduplicated storage.

Aging and Pruning Process

To prune data from deduplicated storage, a counter system is used in the Deduplication Database (DDB) primary table to determine the number of times a deduplication block is being referenced. Each time a duplicate block is written to disk during a data protection job, a reference counter in the primary table is incremented. When the data aging operation runs, each time a deduplication block is no longer being referenced by an aged job, the counter is decremented. When the counter for the block reaches zero, it indicates that no jobs are referencing the block. The signature record is removed from the primary table and placed in the zero reference table.

The aging and pruning process for deduplicated data is made up of several steps. When the data aging operation runs, it appears in the Job Controller and may run for several minutes. This aging process logically marks data as aged. Behind the scenes on the MediaAgent, the pruning process runs, which can take considerably more time depending on the performance characteristics of the MediaAgent and DDB, as well as how many records need to be deleted.

Pruning Methods

Commvault® software supports the following pruning methods:

  • Drill Holes – For disk libraries and MediaAgent operating systems that support the Sparse file attribute, data blocks are pruned from within the SFILE. This frees up space at the block level (default 128 KB) but over time can lead to disk fragmentation.
  • SFILE truncation – If all trailing blocks in an SFILE are marked to be pruned, the End of File (EOF) marker is reset for reclaiming disk space.
  • SFILE deletion – If all blocks in an SFILE are marked to be pruned, the SFILE is deleted.
  • Store pruning – If all jobs within a store are aged and the DDB is sealed and a new DDB is created, all data within the sealed store folders are deleted.

 Note: The Store pruning method is a last resort measure and requires sealing the DDB, which is strongly NOT recommended. This process should only be done with Commvault Support and Development assistance.


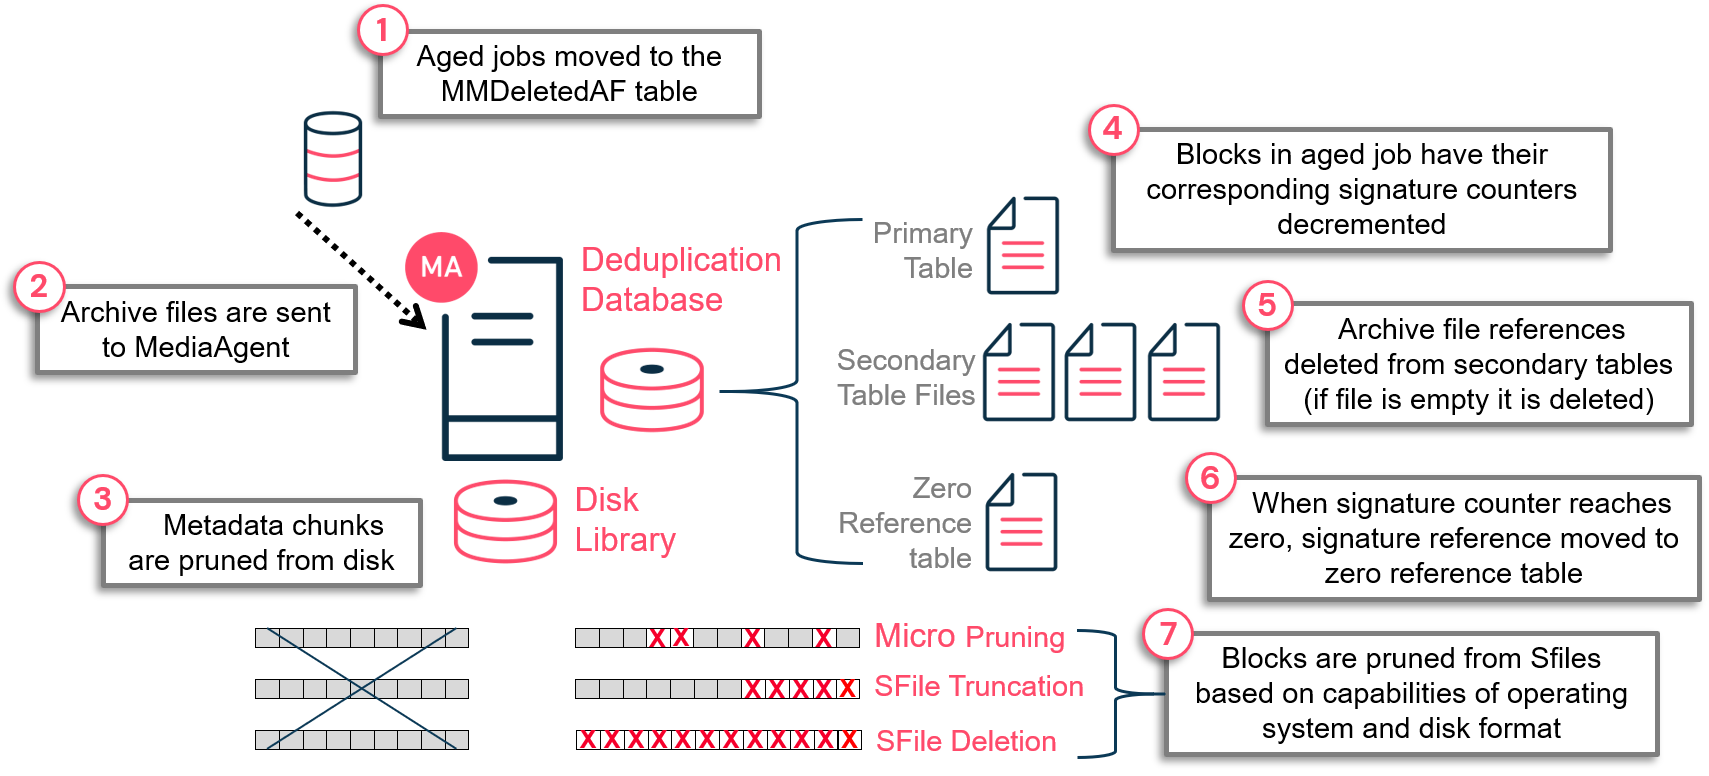
Aging and Pruning Steps:

  1. Jobs are logically aged which results in job metadata stored in the CommServe® database as archive files being moved into the MMDeletedAF table. This occurs based on one of the following conditions:
    1. Data aging operation runs and jobs which have exceeded retention are logically aged.
    2. Jobs are manually deleted, which logically marks the job as aged.
  2. Job metadata is sent to the MediaAgent to start the pruning process.
  3. Metadata chunks are pruned from disk. Metadata chunks contain metadata associated with each job so once the job is aged the metadata is no longer needed.
  4. Signature references in the primary table are decremented for each occurrence of the block.
  5. Job information related to the aged job is deleted from the secondary table files.
  6. Signatures no longer referenced are moved into the zero reference table.
  7. Signatures for blocks no longer being referenced are updated in the chunk metadata information. Blocks are then deleted using the drill holes, truncation or chunk file deletion method.

Pruning process for deduplicated data


Reclaim Idle Space

Aging deduplicated data involves purging aged blocks using one of the following methods; SFILE truncation, SFILE deletion, and drill holes. Drill holes, however, rely on a file system function called the sparse file. The sparse file attributes drills holes within an SFILE, removing aged blocks. This free space can later be used for new blocks. Unfortunately, several storage units and file systems do not support the file sparse attribute. Therefore, the aged blocks are marked as invalid but not deleted. Over time it leads to fragmentation, and a storage target could potentially run out of space to write new blocks.

Idle space on storage not supporting the sparse file attribute can be reclaimed using the 'reclaim idle space' option from the DDB data verification job. This defrag operation copies the SFILE valid blocks sequentially, freeing up the invalid block space that can be later used to write new chunk files.

Reclaim idle space process


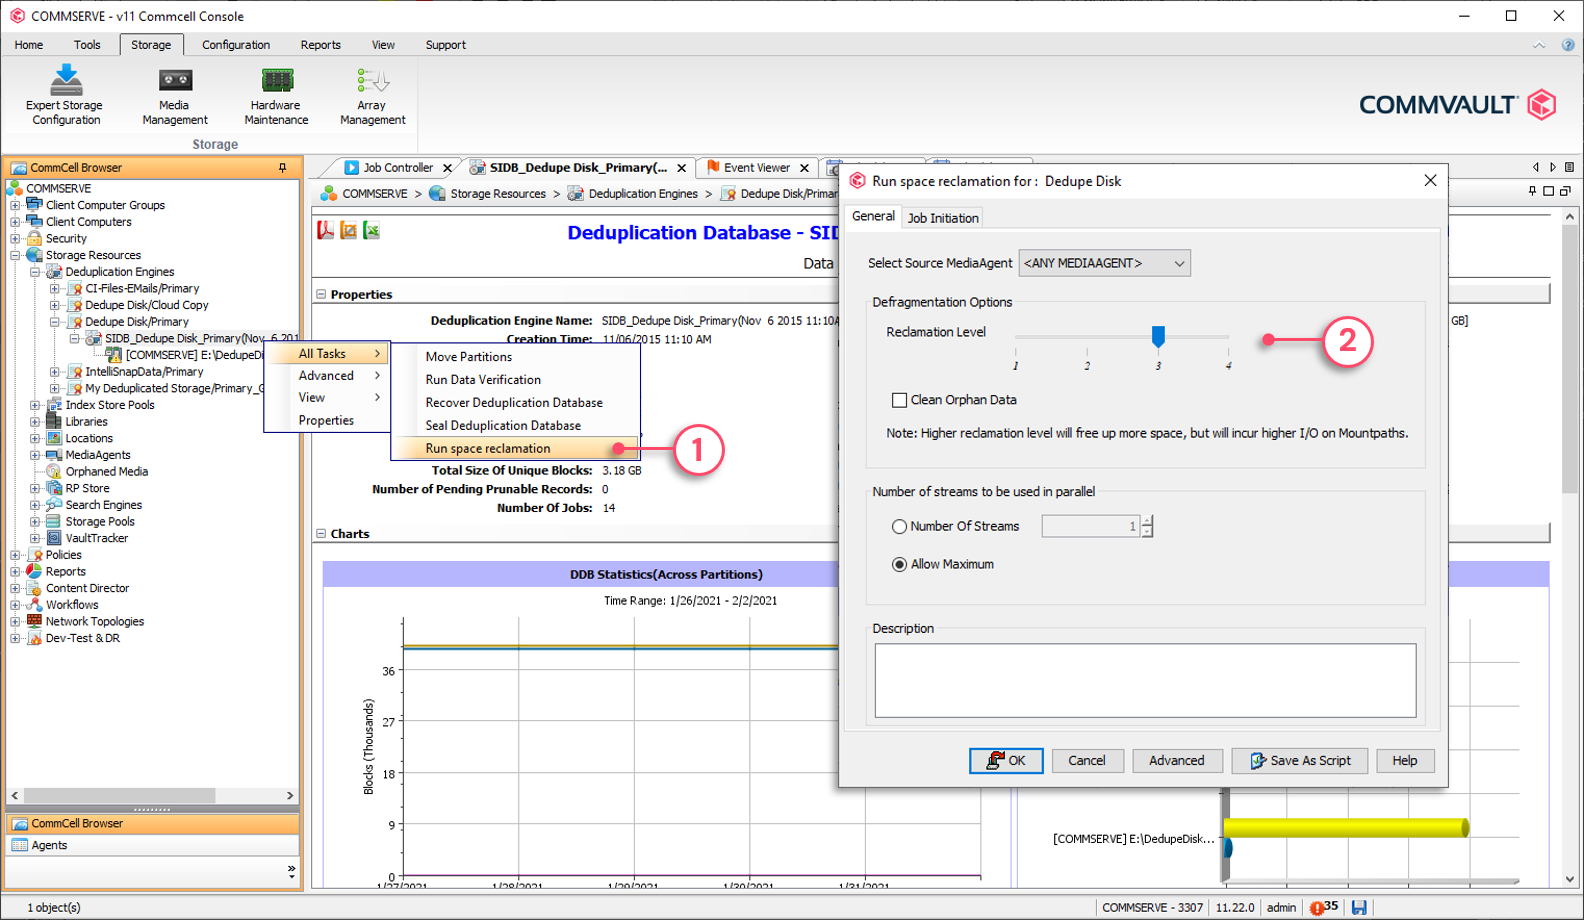
Running a job to reclaim idle space

1 - Right-click DDB partition | All Tasks | Run space reclamation.

2 - Click OK to run the space reclamation.


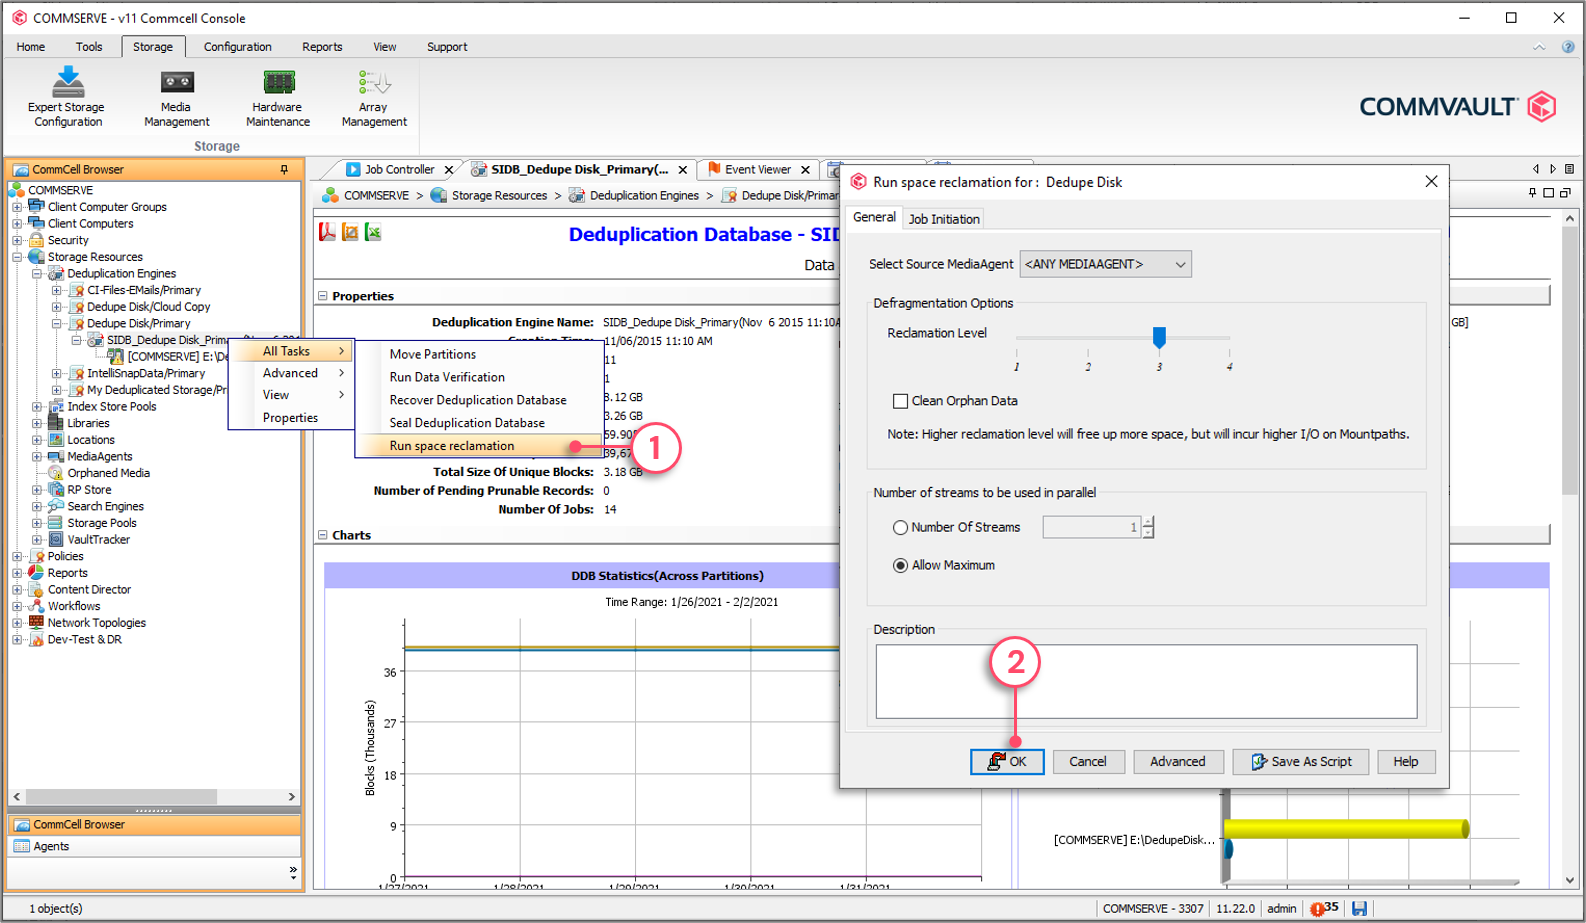
3 - The job progress can be monitored from the Job Controller.


Idle Space Reclamation Level

Launching an idle space reclaim job requires you to define the idle space reclamation level to use. Levels go from one to four. Level three (40%) is used as a default. These levels are based on the invalid block percentage; the percentage of blocks within a chunk file that are either aged or orphaned that can be deleted to make room for new blocks.

NOTE: For HyperScale® environments, the default threshold for idle space reclaim job is 50%.

The percentage levels are as follows:

LevelInvalid Block %
180% (least aggressive)
260%
340% (default)
420% (most aggressive)


The percentage defines the threshold of invalid blocks for a chunk file to be a candidate for defragmentation. It is important to select the appropriate level. A more aggressive level means that more blocks have to be copied. For example, the most aggressive level is 4, which marks a chunk file to be a candidate for defragmentation as soon as it reaches 20% of invalid blocks. Therefore, the remaining 80% of valid blocks must be copied sequentially.


To set idle space reclamation level

1 - Right-click DDB partition | All Tasks | Run space reclamation.

2 - Move the slider to the appropriate level.


Reclaim Idle Space Job Phases

Running the idle space reclamation job is performed in three phases. Understanding the role of each phase is useful for troubleshooting purposes.

Idle space reclamation job phases:

  • Validate Dedupe Data
  • Orphan Chunk Listing
  • Defragment Data

Validate Dedupe Data

This phase validates if the data blocks referred to by the DDB are accessible as expected. If not, (e.g., corrupted chunk), the blocks are marked as invalid and will not be referenced anymore. When the blocks are encountered again, they will be backed up. This is seen as self-healing technology. 

During this phase, the list of chunk files meeting the idle space threshold is also created and logged in the DDBMountpathInfo.log file.

Orphan Chunk Listing

This phase validates if the mount paths contain blocks for which there are no entries in the DDB (orphan blocks). Orphan blocks are marked as invalid and will be purged from storage.

Defragment Data

This phase crawls through every chunk file that met the space reclamation threshold and will copy the blocks sequentially, removing empty spaces. Depending on the selected reclamation level, this phase can take several minutes/hours and can be I/O intensive for the storage unit.


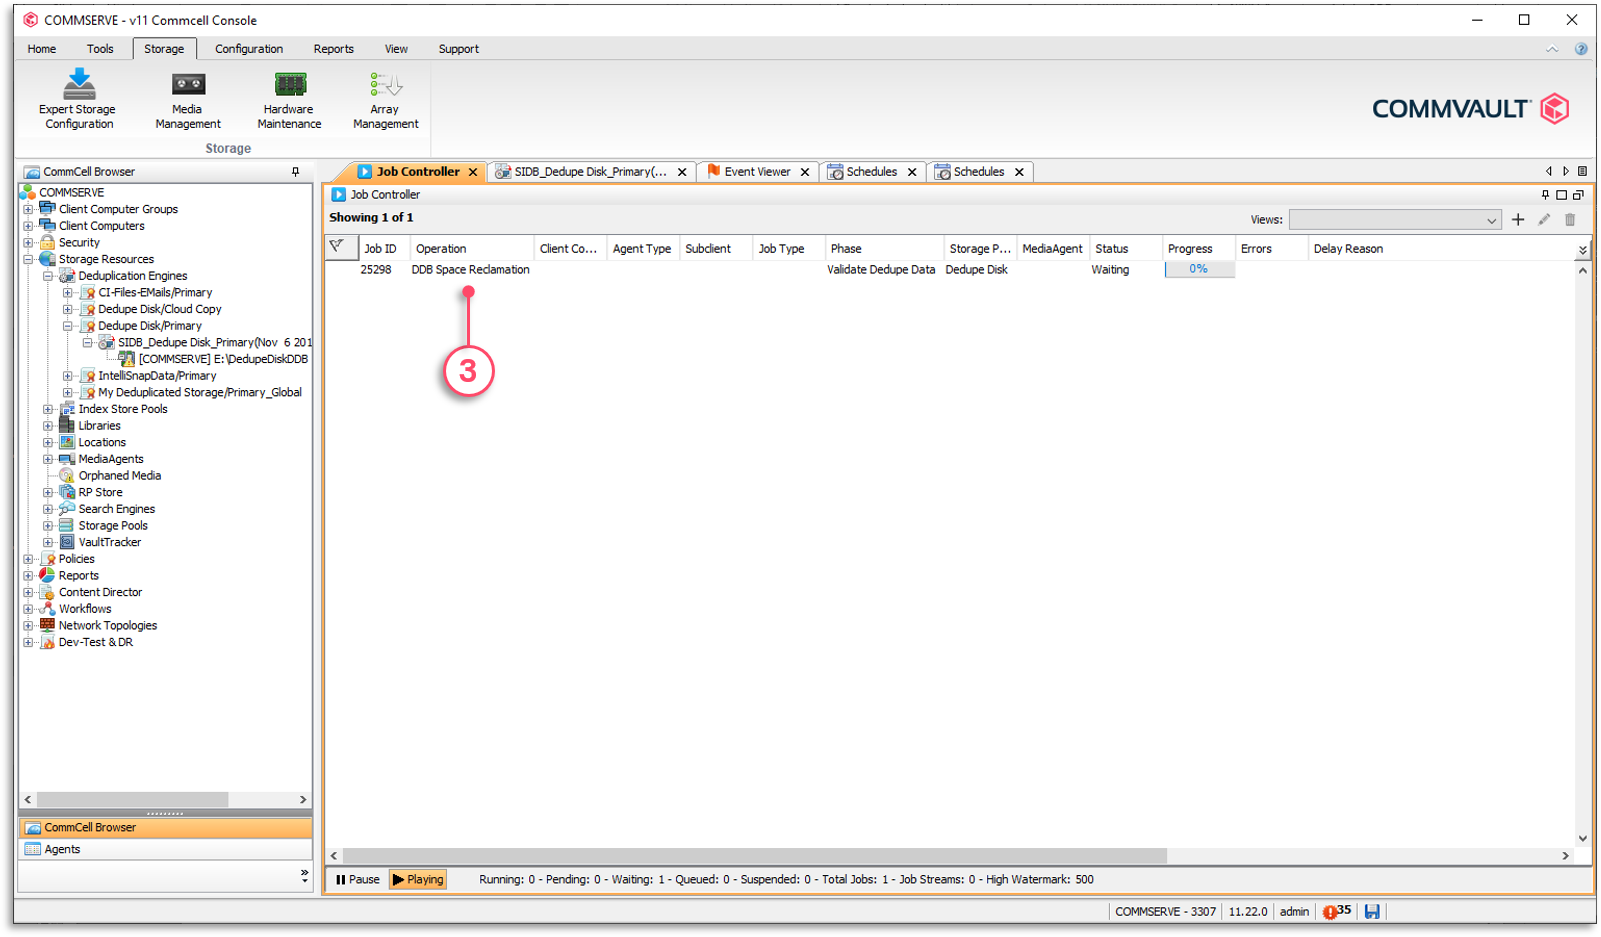
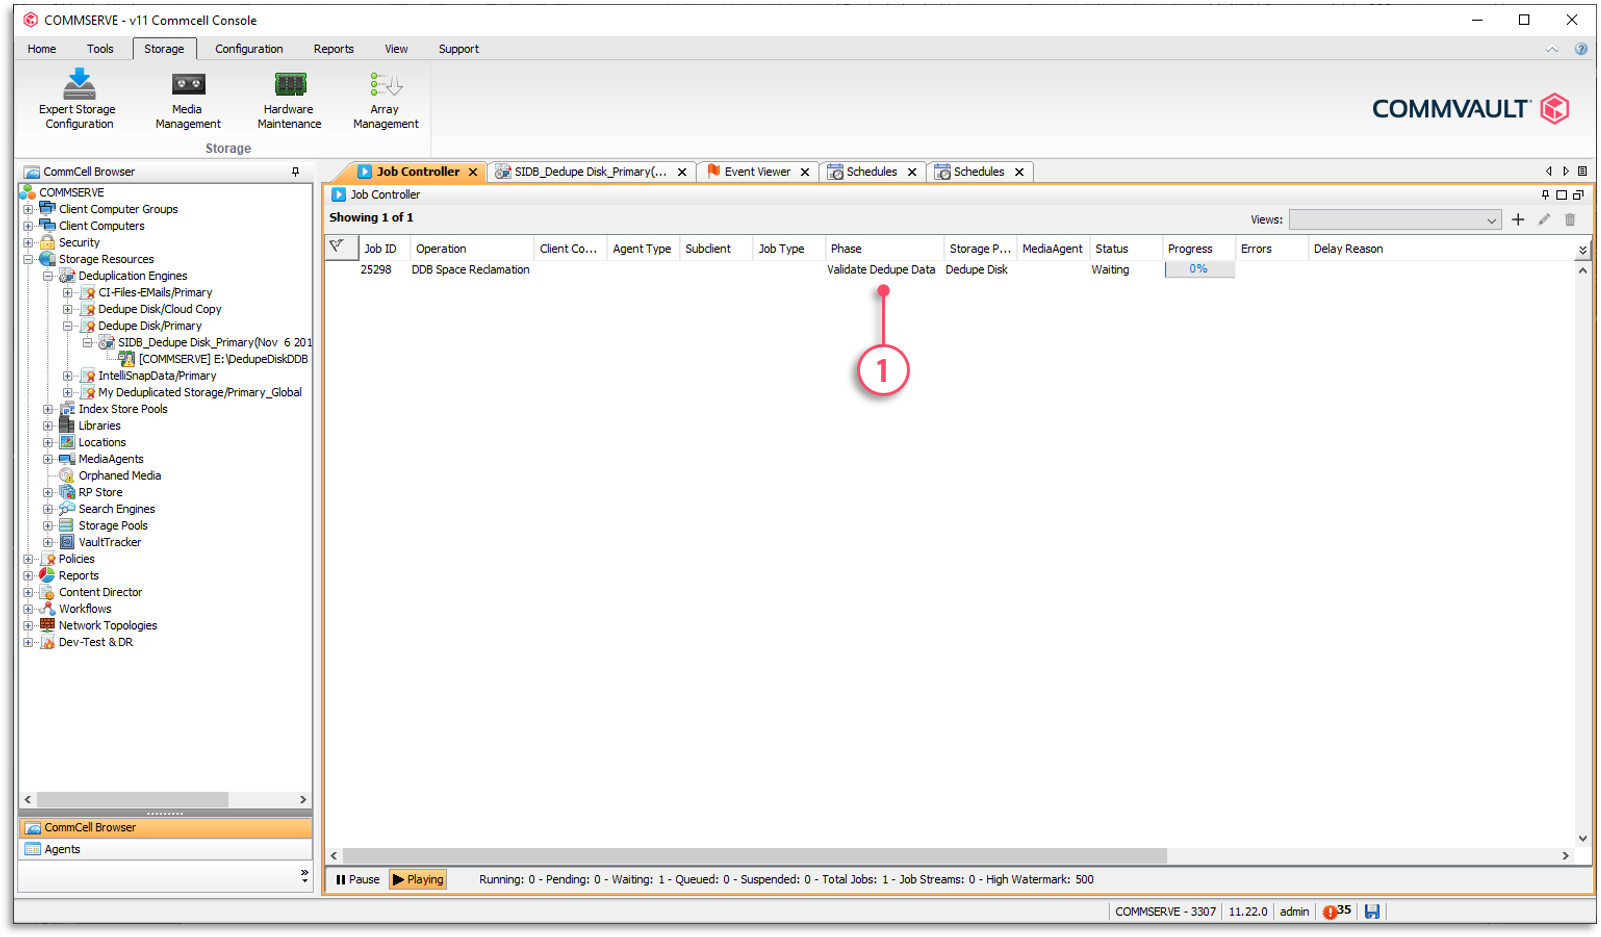
The Reclaim Idle Space phases

1 - The current phase is displayed in the Phase column. The first phase is ‘Validate Dedupe Data’ phase and the second is the ‘Defragment Data’ phase.


Controlling Pruning Operations

Right-click the MediaAgent | All Tasks | Operation Window

The physical pruning process can be resource-intensive on the MediaAgent and disk storage. An operation window is configured on the MediaAgent to determine when pruning will occur.


To set DDB pruning operation rules

1 - Right-click MediaAgent | All Tasks | Operation Window.

2 - Click Add.

3 - Select Data Pruning.

4 - Add Do not run intervals.

5 - Define the days and time interval.


Why is My Data Not Aging

A big part of media management and reclaiming storage for new jobs is based on understanding how Commvault® job-based retention works. Beyond standard days and cycles retention, there are additional circumstances that may prevent jobs from aging:

  • Mixed retention on tape
  • Failing Jobs
  • Unscheduled Backups
  • Auxiliary copies not running or not completing
  • Deconfigured Clients

Mixed Retention on Tape

If jobs with different retention are on tape, the tape does not recycle until the longest retained job exceeds retention. There are several situations where jobs with mixed retention may exist on tapes:

  • Backup and archive data on the same tape with different retention settings
  • Extended retention rules have been applied to a job
  • Schedule-based retention has been applied to a job
  • A job has been manually retained on the tape
  • Job dependencies

Failing Jobs

Since retention for backups are based on both cycles and days, failing full backup jobs can cause a tape not to be recycled. Consider a policy copy using a tape library is managing 30 subclients. Some of those subclients are from a client server that has full back up jobs consistently failing for several weeks. If the retention is configured for 2 cycles and 14 days, there are always a minimum of 2 full backups retained on media. If new full backups are failing, the older full backups remain on tape. This may result in all jobs on the tape being aged except for the jobs from the failing client.

There are several methods to solve this issue:

  • If you are sure that the data is not needed:
  • Select the tape in the assigned media pool, right-click the tape and select Delete Contents.
  • You are then prompted to confirm and type 'Erase and Reuse Media.' Note that once this operation is performed, the tape is moved back into the scratch pool where data can still be recovered until the tape header is overwritten.
  • Use the media refresh feature to consolidate retained jobs to a new tape so the old tape can recycle.

Unscheduled Backups

If backups have been running for a subclient and that subclient was unscheduled or removed from a schedule, full backups will no longer be performed on the subclient. Just like failing jobs, unscheduled subclients result in previous full backups being retained based on the number of cycles configured in the storage policy copy. This causes the tape not to recycle.

If the subclient should be backed up, make sure you schedule a job or associate the subclient with a schedule policy. If the subclient no longer needs protection, remove the subclient from the storage policy. Note that all subclients must be associated with a storage policy in order to perform data protection operations. If you delete the subclient, data previously protected for the subclient continues to be retained until the days criteria is met. If you want to keep the subclient, create a place holder storage policy that you can associate with the subclient. It is very important to note that if a subclient is not scheduled, then the data managed by that subclient will not be backed up.

Deconfigured Clients

When a client is deconfigured, the license is released, but the client remains in the CommCell® environment. This allows data from the client to be restored. The default behavior in this situation is to continue to retain data based on both cycles and days criteria. Since the client is deconfigured, no backups will be performed moving forward so existing data remains in storage indefinitely.

There are several methods to solve this issue:

  • If the license for the client is temporarily being released, Commvault® software allows the license to be re-allocated to the client and backup jobs can then be run. In this situation, when backups recommence, new full backup jobs being run allow older cycles to age.
  • If the client is decommissioned and is no longer used, you can wait until you know the data is no longer needed and then delete the client. The next data aging operation will age all jobs for that client.
  • Another option is if you will no longer be protecting the client but you need to maintain the client in the CommCell® environment. This is usually due to compliance requirements and CommCell reporting to reflect that the client existed, but is no longer being used. There is an option in Control Panel | Media Management applet | Data Aging tab called Ignore Cycles Retention On De-Configured Client. Changing this setting to 1 makes it true and data is aged for deconfigured clients based on the days retention criteria only.

Job Dependencies

In order for a secondary copy to successfully be created, source data for that copy must exist. The source data is determined by the Specify Source setting in the Copy Policy tab. The default source location is the primary copy. If the source copy is required for an auxiliary copy, the source job does not age until the secondary auxiliary copy completes successfully.

There are several methods to solve this issue:

  • The best solution is to make sure auxiliary copy jobs are scheduled for the secondary copy.
  • If you are not planning on making copies for the secondary copy, in the General tab of the secondary copy properties, deselect the Active option. This makes the secondary copy inactive and data ages from the source copy. You can later reactivate the secondary copy.
  • If you don't want to copy specific jobs, choose the Prevent Copy or Do not Copy option in the jobs list of the storage policy copy. 


Checking Tape Status

Viewing Contents of a Tape

From the Assign Media pool | Right-click the desired tape | View | View Contents

When viewing the contents of a tape in an assigned media pool, any job that has exceeded retention appears but is greyed out. Any job currently being retained is in regular black font.


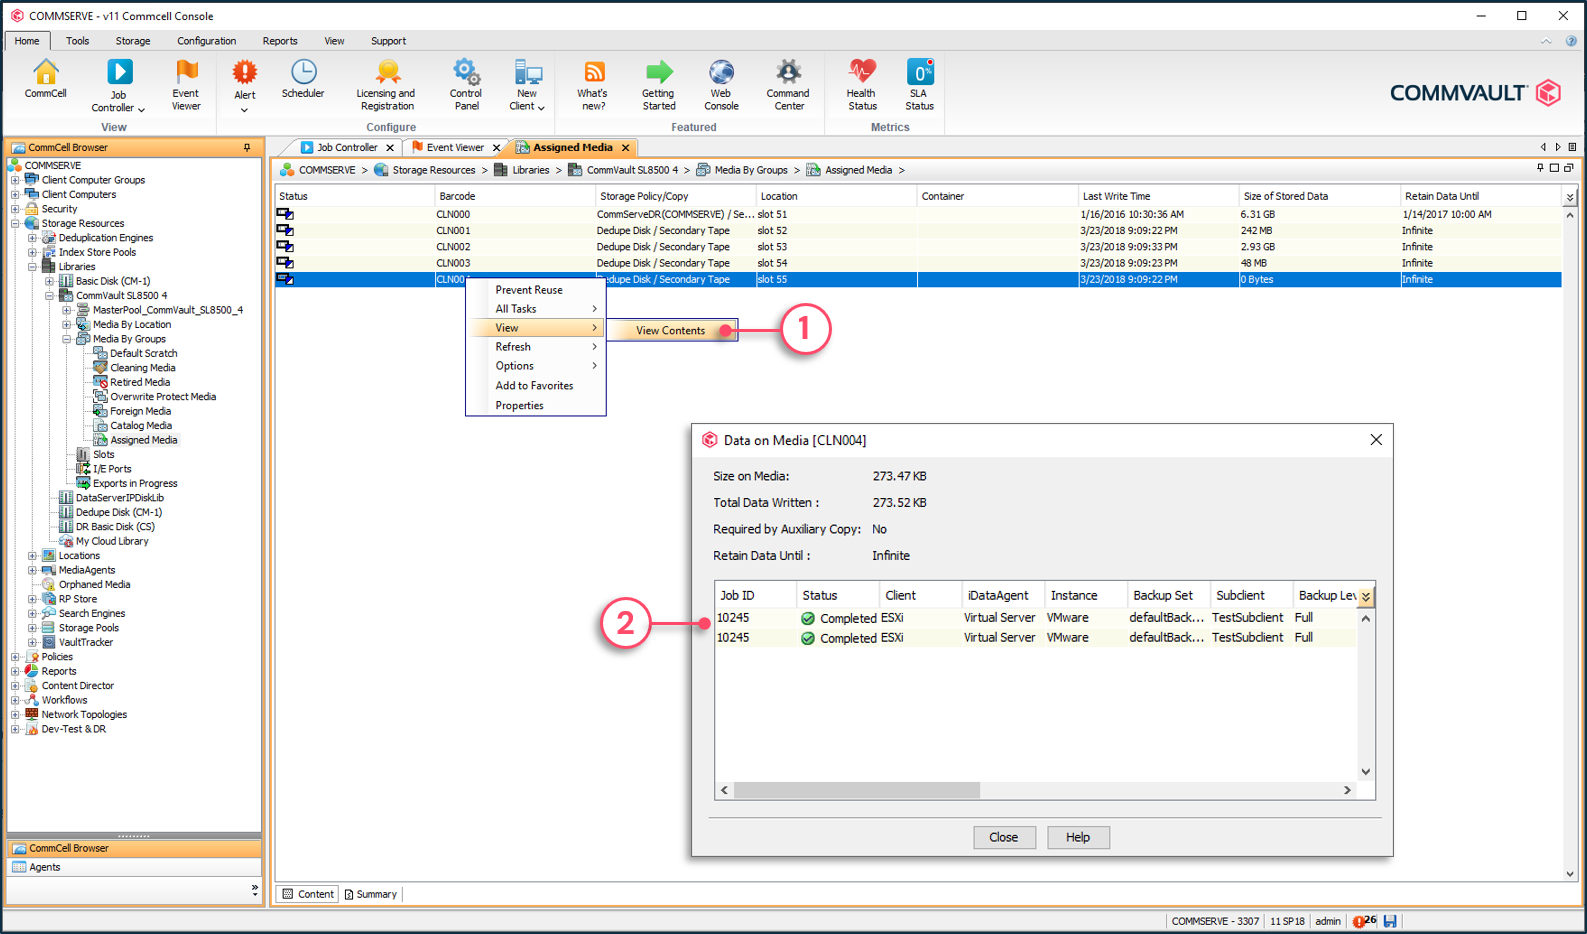
To view contents of a tape in the Assigned Media pool

1 - Right-click tape | View | View Contents.

2 - Job on the tape will be listed. Jobs in black font are active and jobs in grey font are aged.


Data Retention Forecast and Compliance Report

From the Reports menu | Click Other Reports | Forecast

The Data Retention Forecast and Compliance Report displays all jobs for a selected storage policy down to the subclient level. It provides the estimated aging date and reason for not aging. The reason for not aging appears as a hyperlink, which links to an explanation in the Commvault Online Documentation.


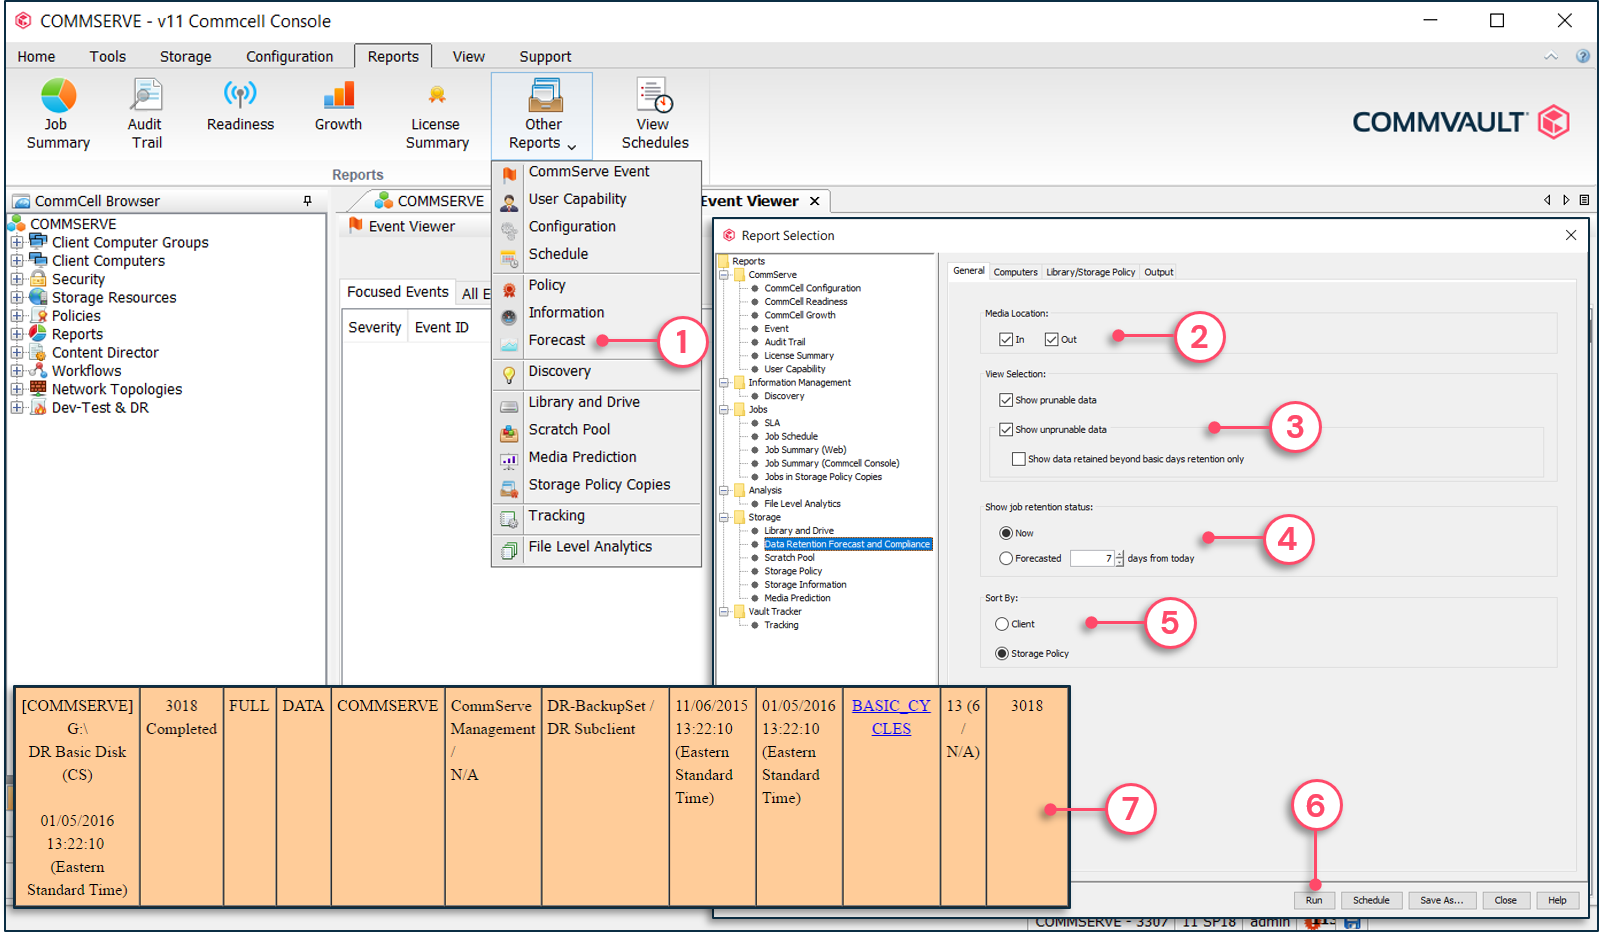
To execute a forecast report

1 - From the Reports menu | Click Other Reports | Forecast.

2 - Specify to include media that are in and/or out of the library.

3 - Specify to include data that is and/or is not aged out.

4 - Show the current status of jobs or as forecasted in the future.

5 - Sort the jobs by client or storage policy.

6 - Click Run.

7 - The report lists all jobs and provides information such as retention.


Copyright © 2021 Commvault | All Rights Reserved.