Commvault

Post Installation Tasks - CommCell® Console

Quick Links to Topics:


Post Installation Tasks

After the CommServe server has been installed, several post installation tasks are necessary before moving onto the remainder of the deployment.

  • Apply production license key
  • Configure Software Cache and Updates
  • Apply updates to the CommServe® server
  • Review and test the CommServe DR backup configuration
  • Configure private and cloud metrics reporting
  • Configure and test email settings
  • Configure user accounts and security


CommCell® License

When deploying Commvault V11, specific information is required to acquire a full production license:

  • The CommServe must be installed.
  • Collect CommCell ID, Serial No and the Registration Code.
  • For the license file, send email to prodreg@commvault.com to obtain key.


Configure Software Cache and Updates

Commvault follows a quarterly schedule for Feature Releases. Feature Releases and Maintenance Releases are available initially for manual download from the Maintenance Advantage website. They are then moved to auto-update via the Commvault software update cache process approximately two weeks after initial availability. Feature Releases should be deployed when available.

Additional hotfixes may follow the release of a Feature Release to address critical issues. The hotfixes, included in Maintenance Releases, should also be applied as soon as they are available. Subsequently, if a new Feature Release or Maintenance Release hotfix conflicts with an older installed hotfix, the installation process removes them automatically.

By default, the system creates automatic schedules that download and install updates on Commvault® servers, as well as on clients. These schedules can be modified as needed.

Software and update cache locations are configured as follows:

  • Primary cache location where all CommCell® resources pull software and updates, unless configured to use a remote cache.
  • Remote caches are used as secondary cache locations, which is beneficial for remote locations. Secondary caches are set up on local clients at the location to pull software and updates locally avoiding additional WAN traffic.


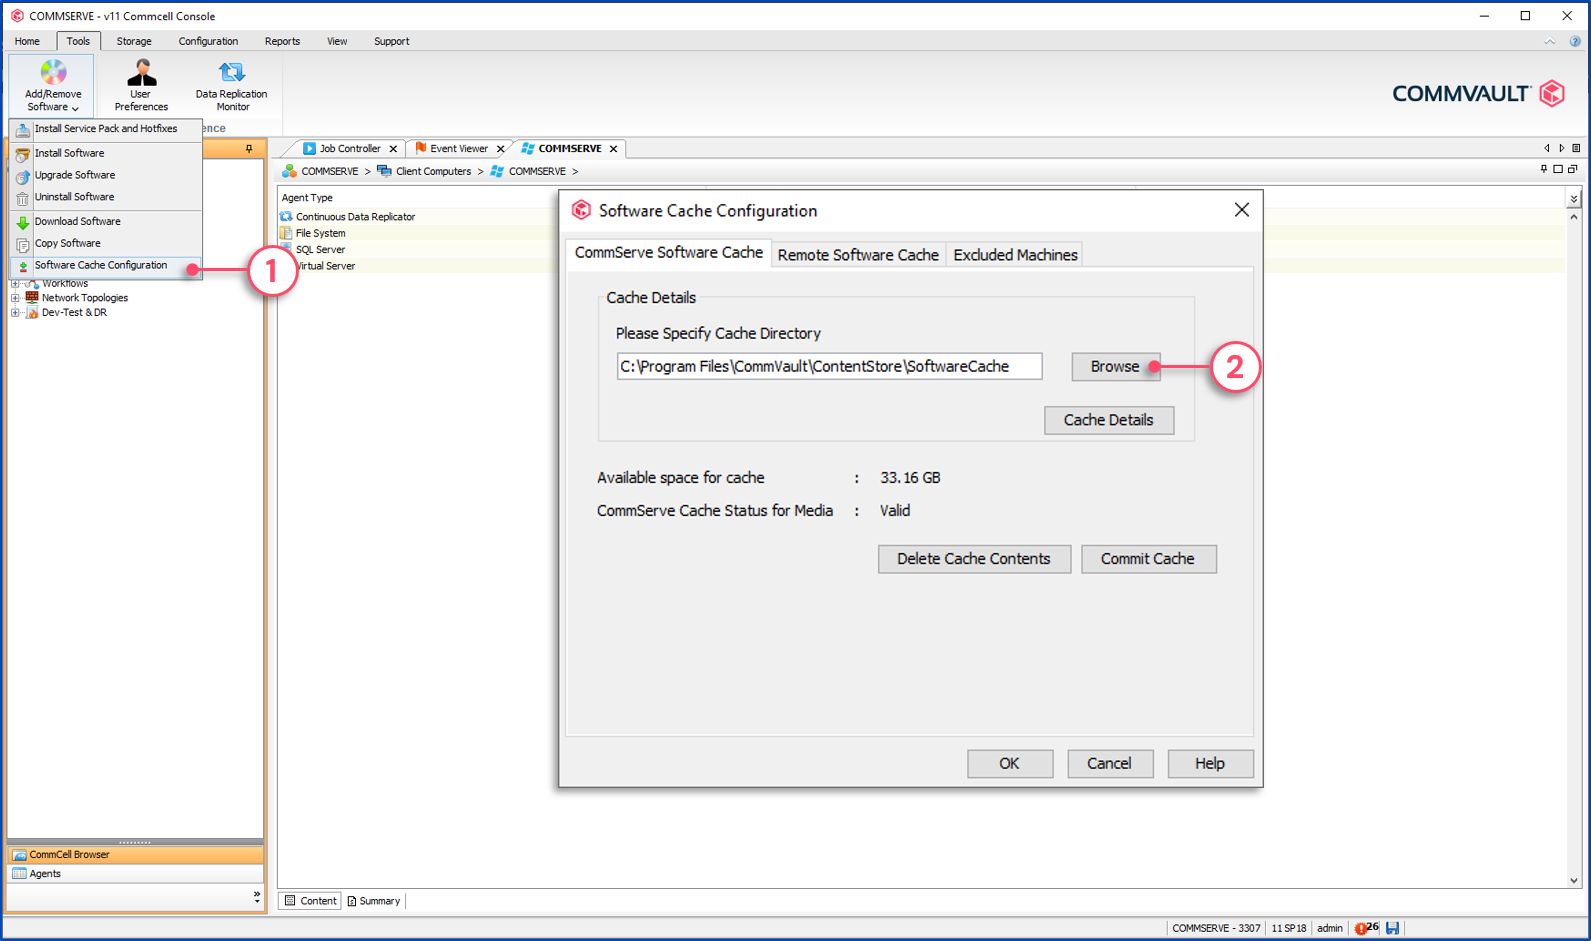
To configure the Software Cache

1 - Click Add/Remove Software | Software Cache Configuration.

2 - In the CommServe Software Cache tab, specify the local path to store software and updates.


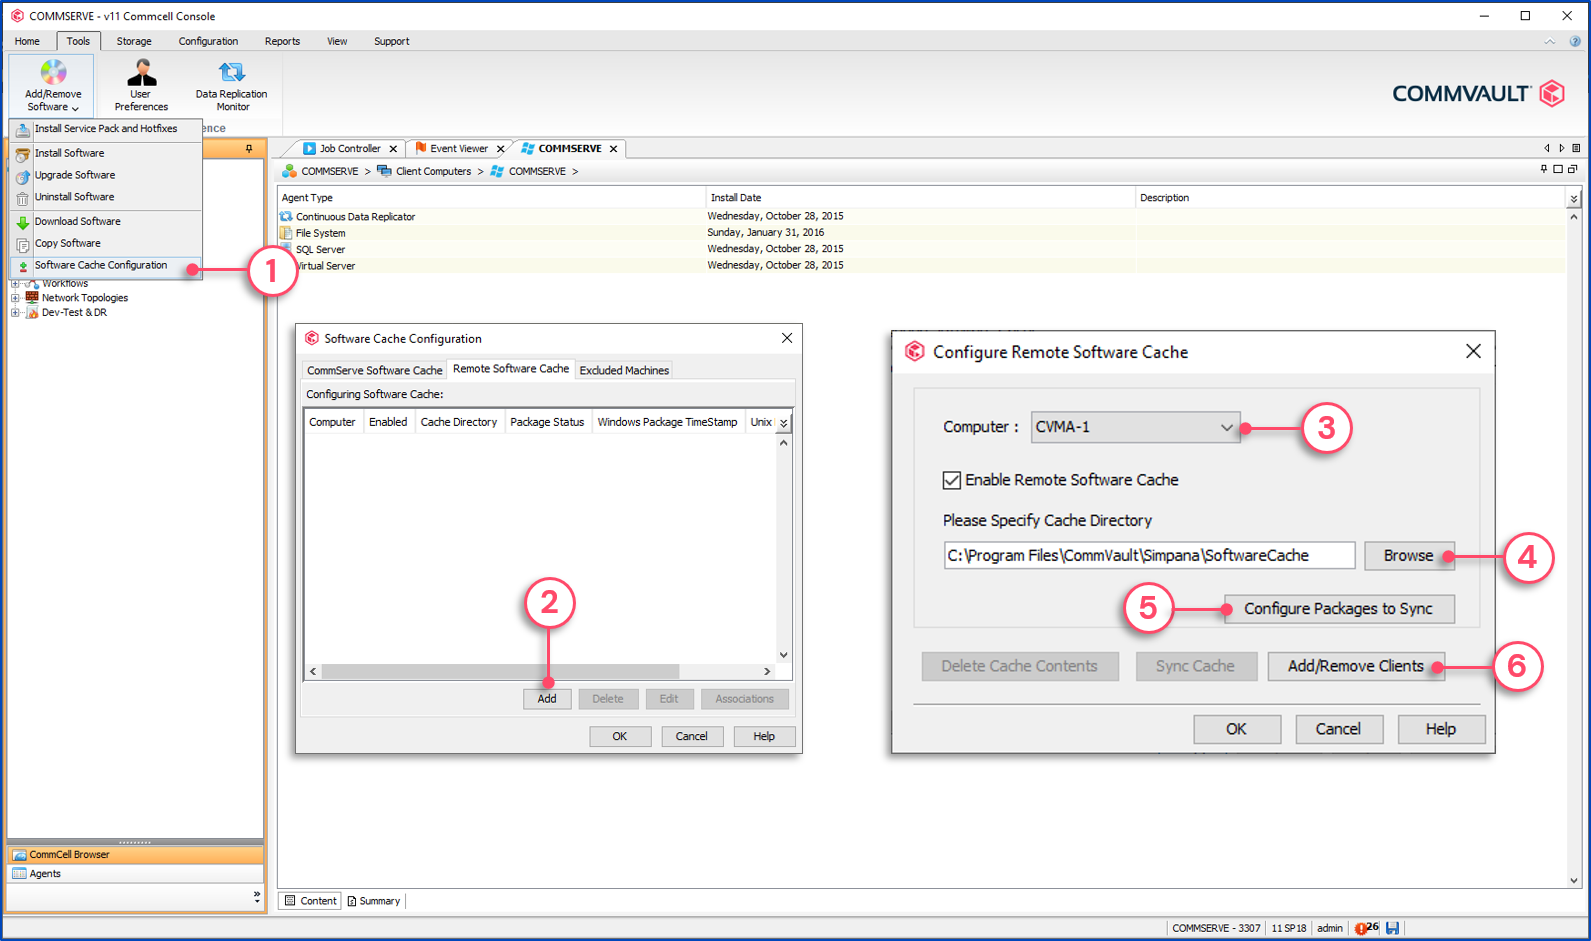
To configure a remote Software Cache

1 - Click Add/Remove Software | Add/Remove Software Configuration.

2 - In the Remote Software Cache tab, add the machine used as a remote cache.

3 - Select the client that will host the Remote Software Cache.

4 - Define the folder in which to store the packages.

5 - Configure the desired packages to sync.

6 - Define clients that will get updated from this cache.


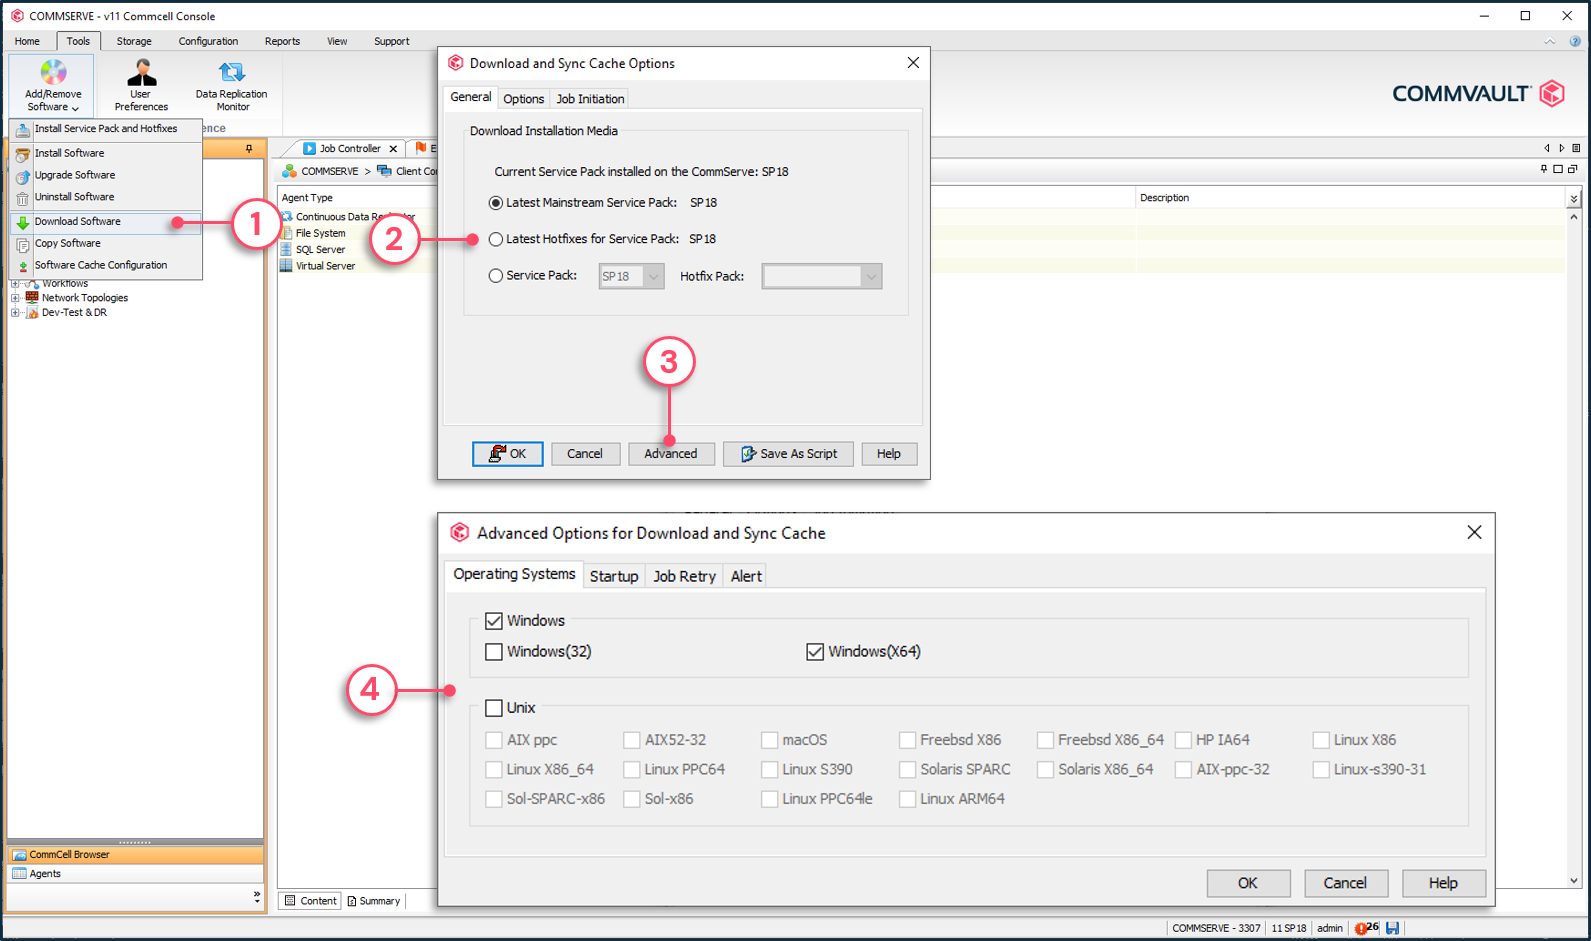
To populate the software cache

1 - From the Tools menu | Add/Remove Software | Download Software.

2 - Choose the service pack level desired.

3 - Click Advanced to open the advanced download and sync cache options.

4 - Choose agent types to download.


Automatic update schedules are as follows:

  • System Created Download Software – Download the updates automatically in the software cache once a week if new updates are available.
  • System Created Install Software – Automatically install updates on Commvault® servers and clients once a week if required. For instance, many companies have change control procedures in place. Installing updates automatically on servers might go against these procedures. In this case, the System Created Install Software schedule can be modified or simply disabled.


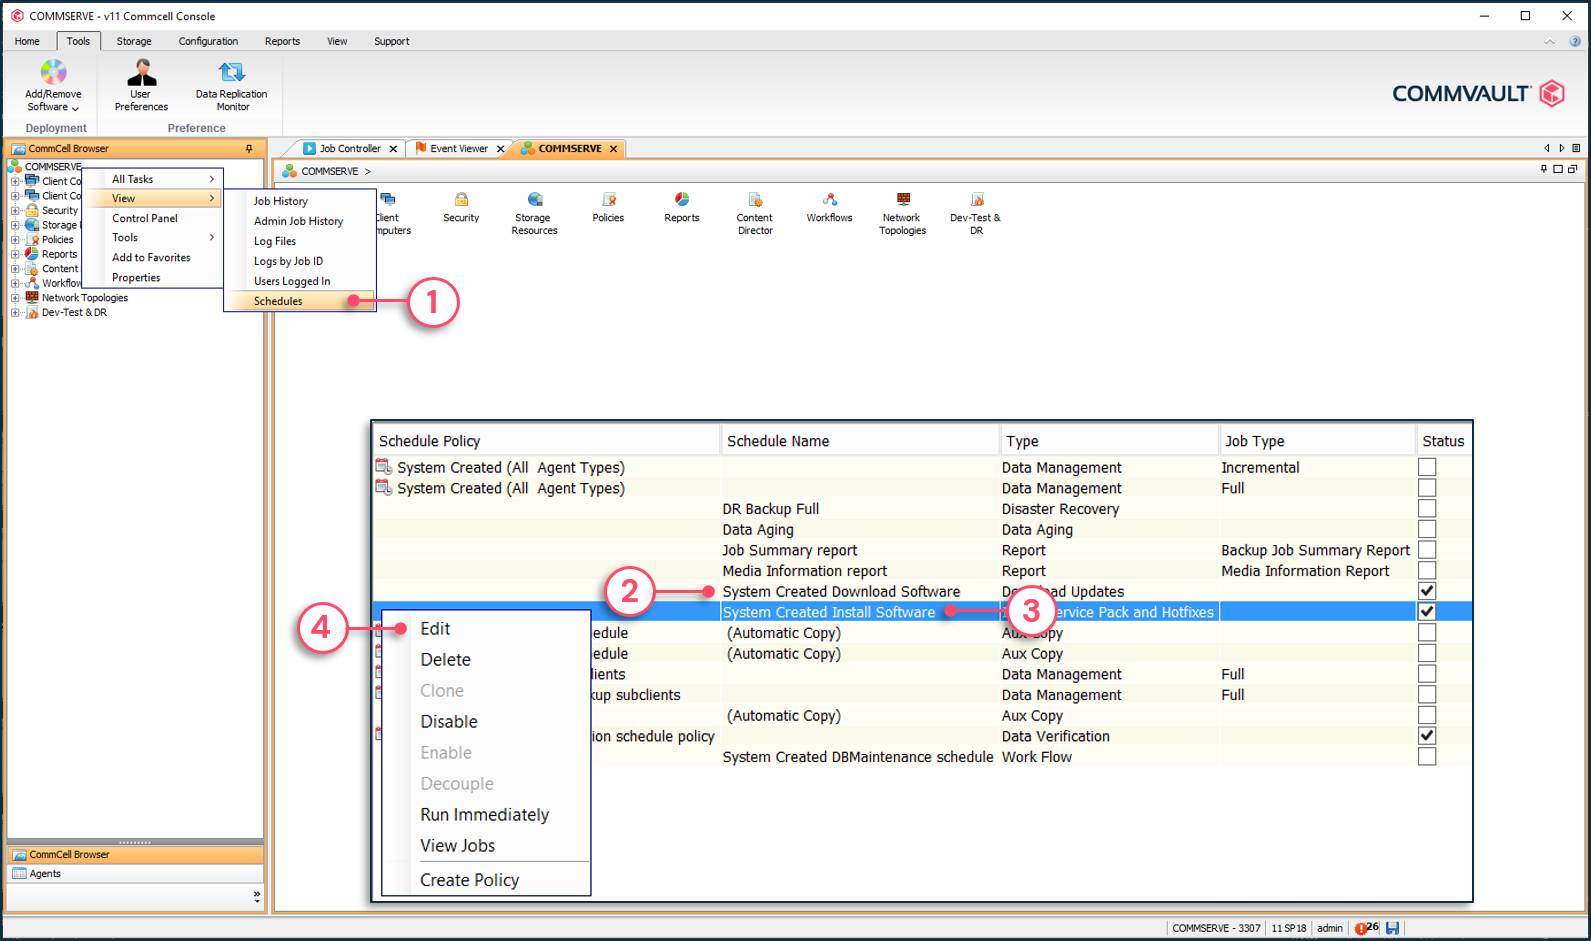
To view or modify automatic update schedules

1 - Right-click the CommServe® Server | View | Schedules.

2 - Schedule that downloads update in the cache automatically.

3 - Schedule that updates install on the servers automatically.

4 - Schedule can be edited, disabled or executed immediately.
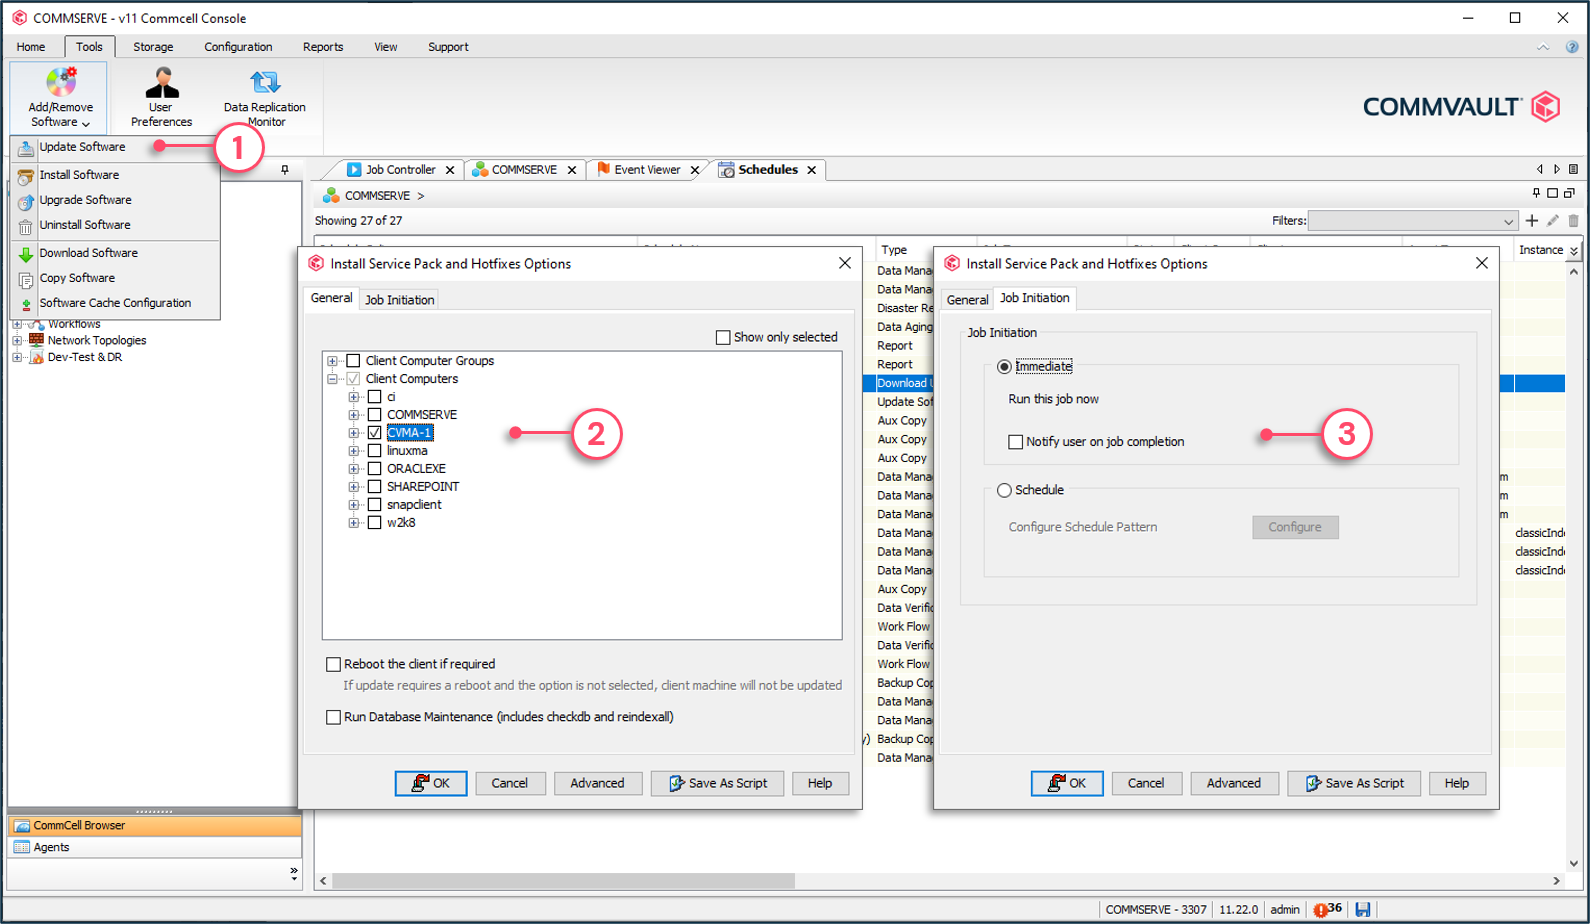


Apply Updates to the CommServe® Server

From the Tools menu | Add/Remove Software | Install Service Pack and Hotfixes
The next step is to ensure that the CommServe® server is up to date. This provides all the latest configuration options available. Updates can be deployed from the software cache using the CommCell console.


To install updates

1 - From the Tools menu | Add/Remove Software | Update Software.

2 - Choose desired clients or client group.

3 - Choose either to install immediately or schedule for later.


CommServe DR Backup Configuration

CommServe DR backup is an administrative task that protects the CommServe® server metadata database. The DR backup protects the database in two phases. First, it creates an export of the database in a location provided in the DR Backup applet from the Configuration menu. Then, it creates a copy of that export in a storage policy called CommServeDR. This storage policy is automatically created by the system upon completion of the libraries configuration.

At this point of the deployment, since no libraries are yet configured, only the export location can be defined. The export location must be as far as possible from the CommServe® server, preferably a remote location.


Private and Cloud Metrics Reporting

From the Home menu | Click Control Panel | Cloud or Private Metrics Reporting
Metrics reporting is a tool that monitors and reports on the health of the CommCell® environment and stores the information either in a private Metrics Reporting server, or on Commvault® Cloud metrics services. Once the information is stored, a broad range of reports and dashboards are available through a portal to help an administrator monitor the CommCell® environment.

To use the private server, the Metrics Reporting component must be selected when installing the CommServe® server. Enabling the private or cloud Metrics Reporting is achieved from the Control Panel.


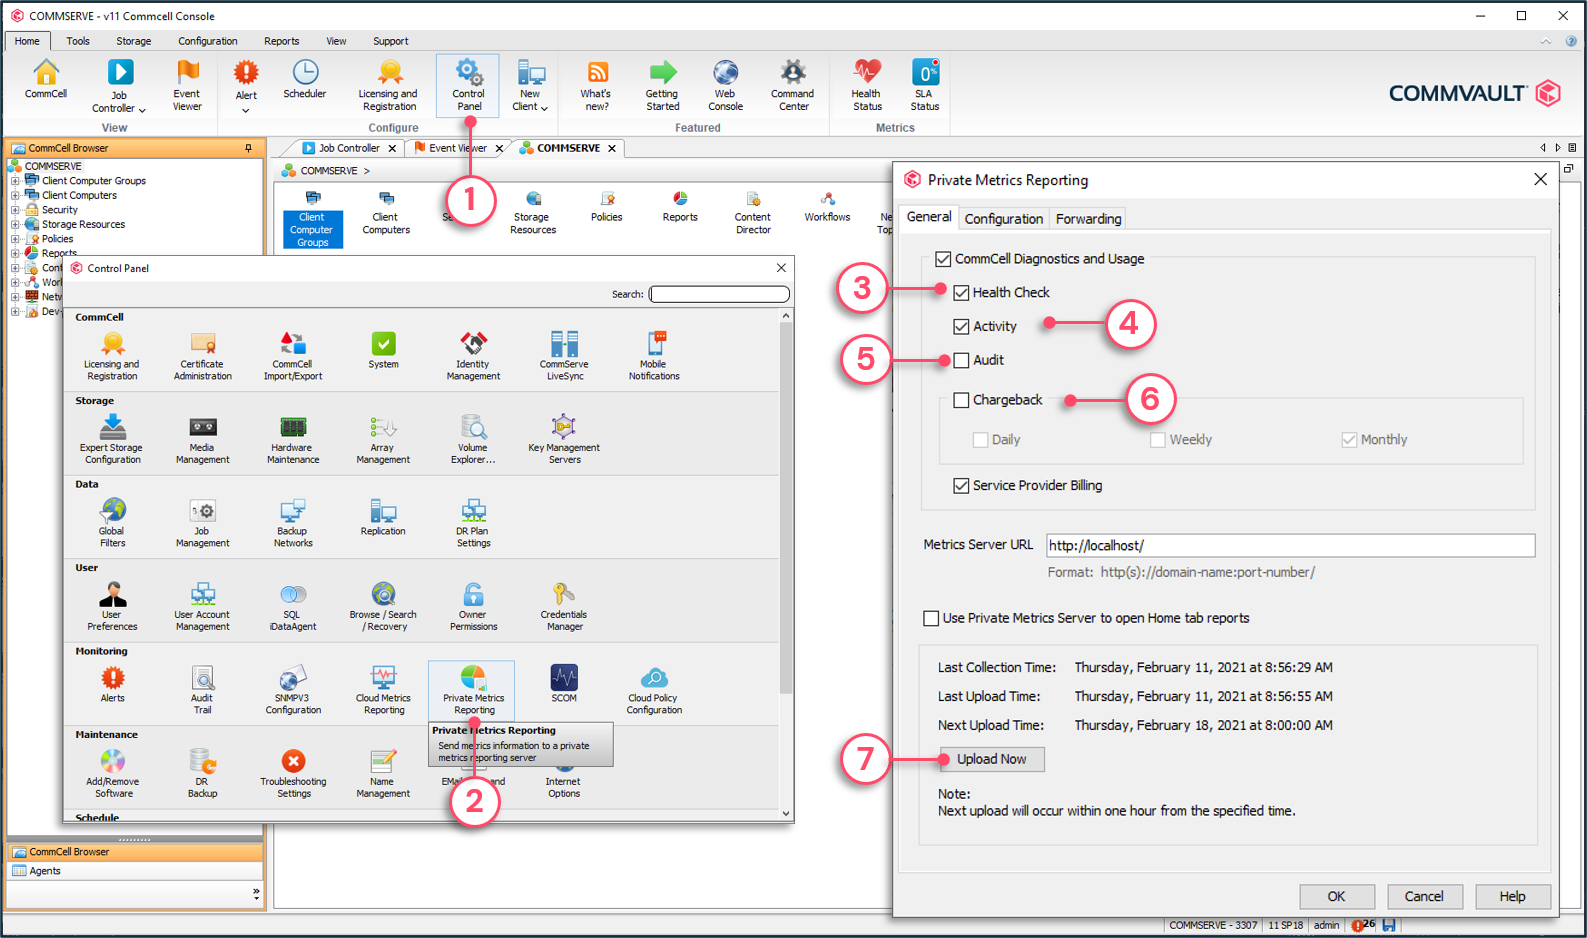
To enable private metrics reporting

1 - From the Home menu | Control Panel.

2 - Choose Private Metrics Reporting.

3 - Collects information about the wellness of the CommCell® environment.

4 - Collects information about job success, client size and errors.

5 - Collects information about CommCell settings.

6 - Collects information about data sizes used for billing.

7 - Manually initiates the upload of information to the Metrics server.


To enable cloud metrics reporting

1 - From the Home menu | Click Control Panel.

2 - Choose Cloud Metrics Reporting.

3 - Collects information about the wellness of the CommCell® environment.

4 - Collects information about job success, client size and errors.

5 - Collects information required to create the pre-upgrade report.

6 - Collects log files to help troubleshooting by Support Team.

7 - Manually initiates the upload of information to the cloud Metrics services.


Email Settings

Commvault® software sends alert notification or reports by email. Prior to using these features, the email server must be configured.

Tip: Configuring Email Settings Using a Secured Mail Server

If your corporate mail server is secured, it is important to understand the level of security. Commvault® software uses a functionality called SMTP relay. This means that the email server relays emails generated and sent by the CommServe® server. Therefore, SMTP relay must be allowed on the mail server for the CommServe® server IP address. Refer to your software vendor documentation for more information about SMTP relay and the mail server.


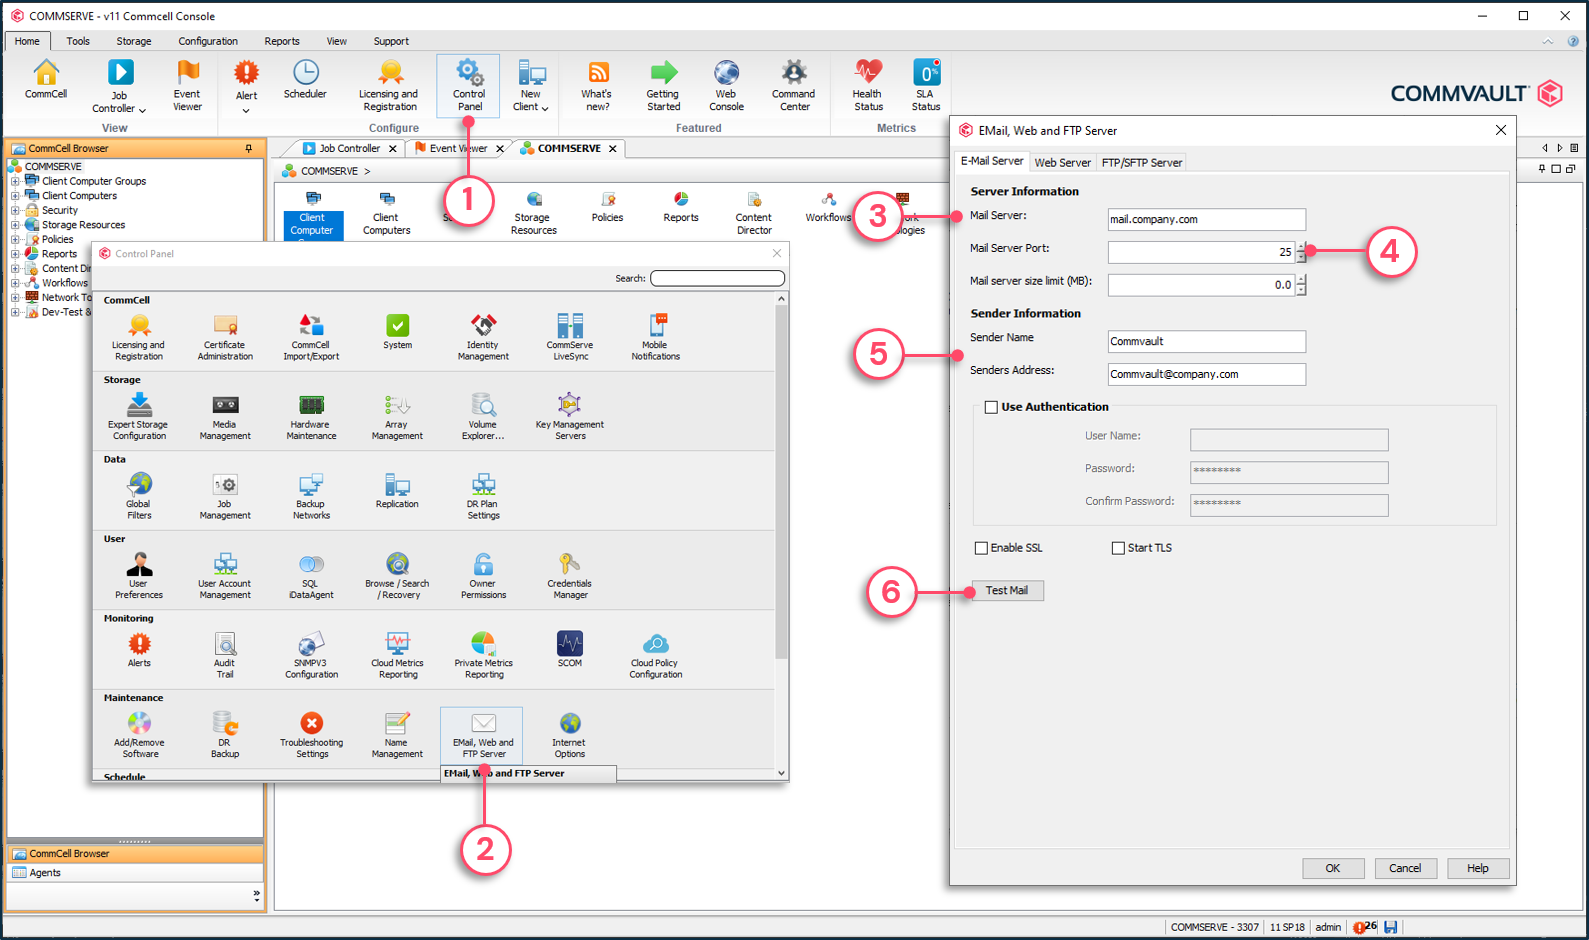
To configure email server settings

1 - From the Home menu | Click Control Panel.

2 - Choose Email, Web and FTP Server.

3 - Define the email server name.

4 - Define the SMTP port to use.

5 - Set the sender name and email address displayed to recipients.

6 - Send a test email to the user currently logged in.


Configure User Accounts and Security

Commvault® software uses two types of accounts to login to the CommCell® console: Commvault user account or Active Directory® integrated account. When the system is installed, a Commvault® administrative account, named 'Admin' is created. This account has all privileges and permissions in the Commvault® software. It cannot be disabled, nor its permissions modified. This account is used to login to the CommCell®, environment in case of a disaster of the domain controller — which prevents the use of Active Directory® integrated accounts.
Additional accounts can be created, and roles defined and applied to allow users to login and perform specific tasks in the system. For instance, a role allowing only backup and restore operations can be created and assigned to the SQL servers and DBA Active Directory account. The result is that a DBA can now connect to the console and only see SQL servers, on which he or she could only run backups and restores.


Security best practices:

  • In addition to the Admin account, create at least one more CommCell® account having all privileges.
  • Ensure primary administrators always use local accounts when managing Commvault® software.
  • Document the passwords of these two accounts with the DR plan.
  • Create an Active Directory® connection to allow the use of Active Directory integrated accounts.
  • When creating a role and security rule, use a test user first to validate if the rule is properly created and gives the expected result. If so, then use it in production.

Each administrator should use its own account. The Admin account should not be used by everyone. This helps in keeping track of any changes in the system using the Audit Trail report.


Copyright © 2021 Commvault | All Rights Reserved.