Commvault
CommServe® Server Deployment
Quick Links to Topics
The first component to be installed in a new CommCell® environment is the CommServe® server. Once it is installed the next step is to install MediaAgent software and detect and configure storage. Plan configuration should be done prior to installing any client agents. To make the agent deployment process smoother, when installing client agents, options to associate the default subclient for the agent with the plan can be selected so pre-configuring plans makes the agent deployment process smoother.
The following summarizes key points for a new CommServe server deployment:
- Commvault software must be downloaded prior to installation. To avoid any deployment delays, arrangements for the software download should be done in advance. Additionally, determine the ability to routinely download updates and upload log files from the CommServe host. If the CommServe will not have internet access, alternate methods should be discussed and documented.
- Determine the location for a local and remote Software Cache. The Software Cache is a directory where Commvault updates and software packages are stored. These can be configured during the deployment and typically help position the software to be routinely accessible throughout the organization – or prepare for a disaster.
- Verify the Hardware and System Requirements.
- Ensure the size of the environment has been assessed and there are adequate resources available for the CommServe server:
- Based on the sizing assessment, determine if the CommServe server will be physical or virtual.
- Determine if the CommServe server needs to be deployed in a clustered configuration for high availability.
- Ensure the operating system meets the Commvault specifications and patched with updates prior to the installation.
- Determine if the method of deployment requires additional considerations for Disaster Recovery. For example, configuring a 'Floating Host Name' for the CommServe server.
- Determine if additional components such as Metrics Reporting or the Workflow engine will be installed on the CommServe server.
- Determine the methods for accessing the CommCell® console and/or Commvault Command CenterTM.
- The Commvault Command CenterTM is installed by default along with the CommServe components.
- IIS is required for the Web Server and Web Console and are automatically installed when IIS is enabled on the CommServe server.
- Although not always required, reboots (powering off and on) may be required to complete an installation or update. It is recommended to anticipate downtime and that the organization's change request or maintenance window process is accommodated in advance. In some cases, the organization may require the changes be implemented after hours.
- Outline the firewall and network considerations prior to any installation. Unless performing a decoupled install, all software components must communicate with the CommServe server during installation. Determine the requirements for working with the organizations firewall configuration in advance.
- Identify any monitoring, security, or anti-virus software that will be installed on the same systems as Commvault software. The installation and in many cases Commvault operations may be blocked or performance severely degraded by such software. This can be avoided by applying the appropriate exceptions or filters for the Commvault software in advance.
- Ensure any Service and Administrative accounts are pre-configured and known during the installation. The account type and permissions required are determined by the components being deployed. A thorough review of the deployment should help determine the needs.
- For the CommServe server, an account with local Administrator privileges is required for the software installation.
- A password for the CommCell 'admin' account is configured during the installation. This password should be a complex password and the primary administrator should always use this account when managing the environment.
- A permanent license file must be applied after the CommServe software is installed. Ensure that any pending purchase agreements are completed prior to the deployment of the Commvault software.
- Complete post installation tasks.

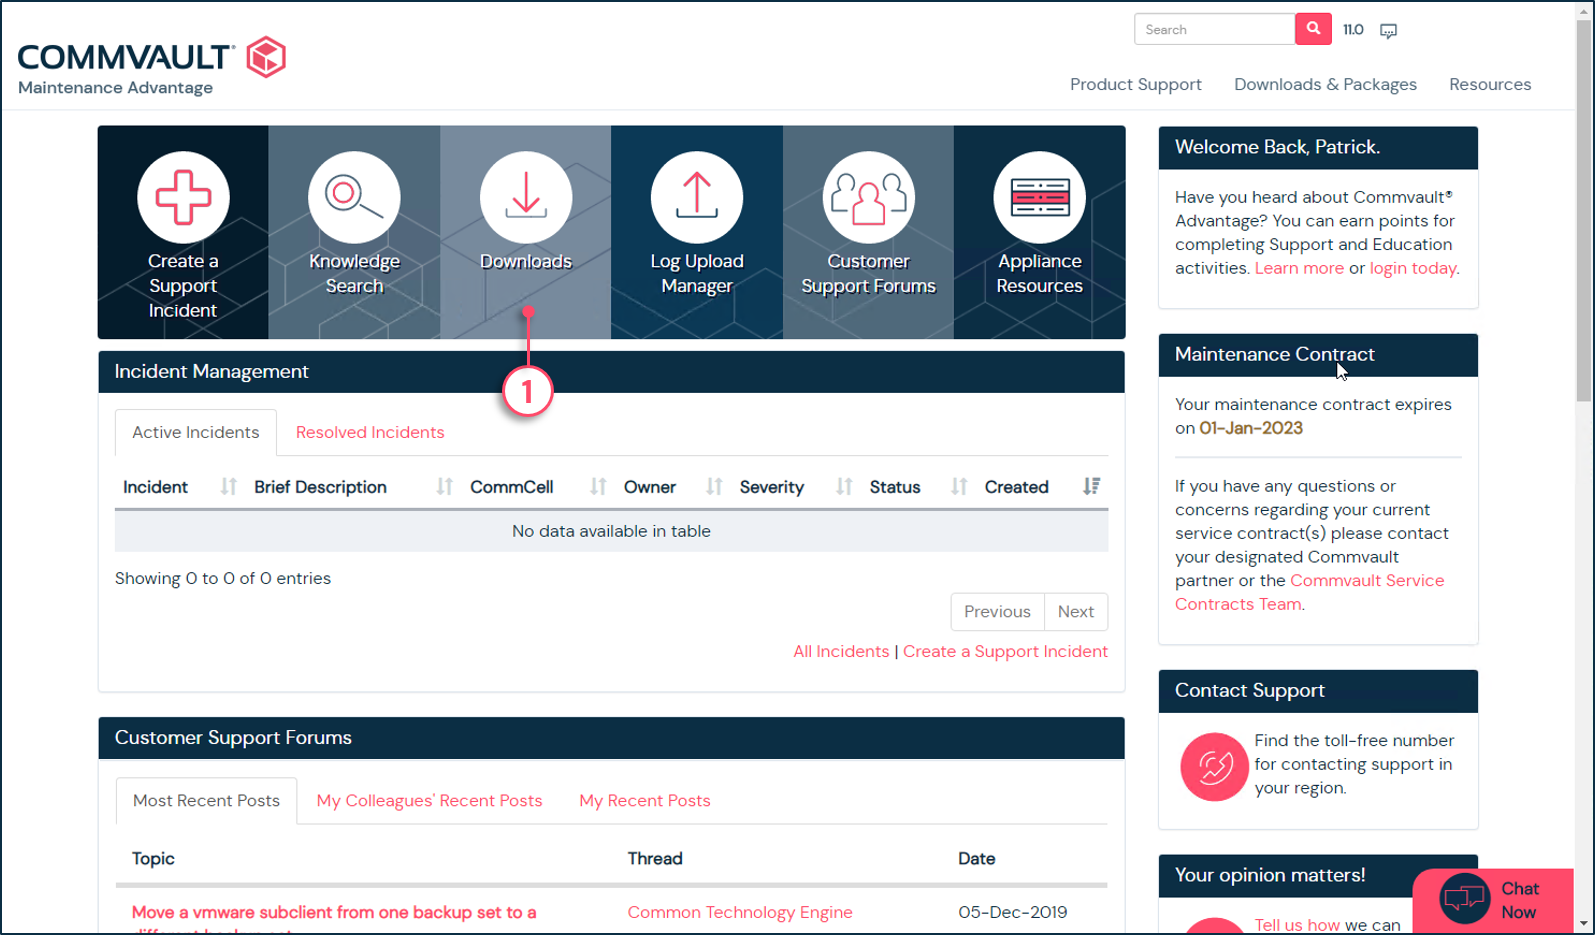
Download Commvault® Software
Commvault® offers several methods for obtaining the software installation media required for installing a CommCell® environment. The Commvault software installation media is available for download from the Maintenance Advantage website or from the Commvault Software Cloud Services download center.
The Commvault Maintenance Advantage website provides the latest version of the Commvault installation media. By clicking Downloads & Packages, you can access the most current software installations and service packs or select a previous version.
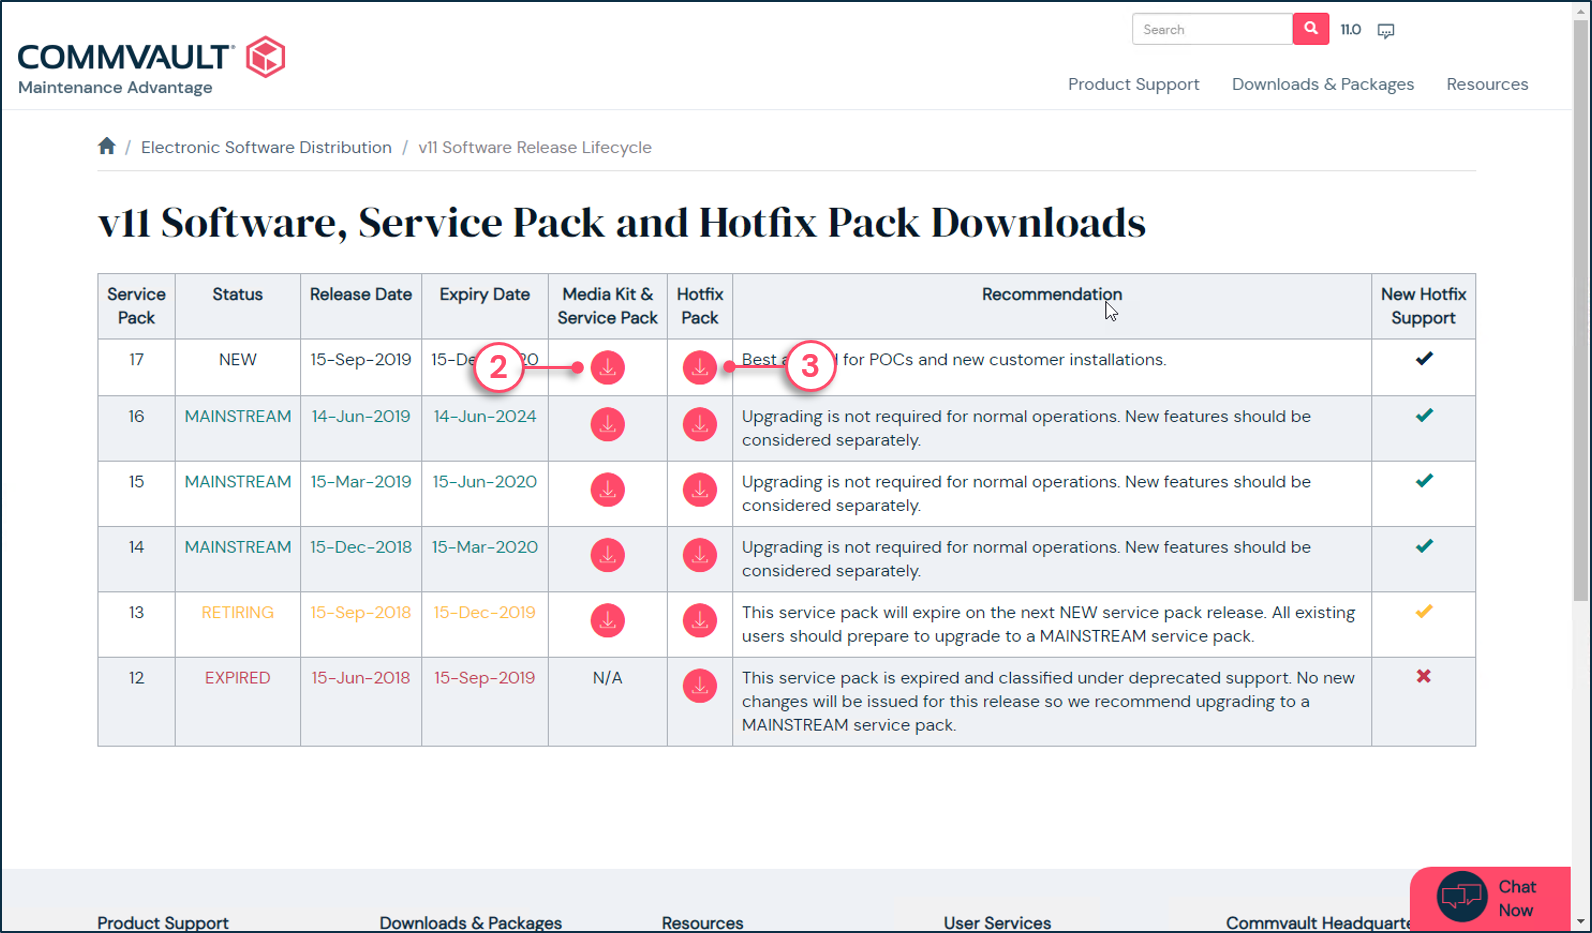
Downloading the software from Maintenance Advantage:
1 - Click to open the downloads page.
2 - Click to download the media kits including the most recent service pack.
3 - Click to download the hot fixes that were launched after the latest service pack.
4 - Click to launch the downloader.
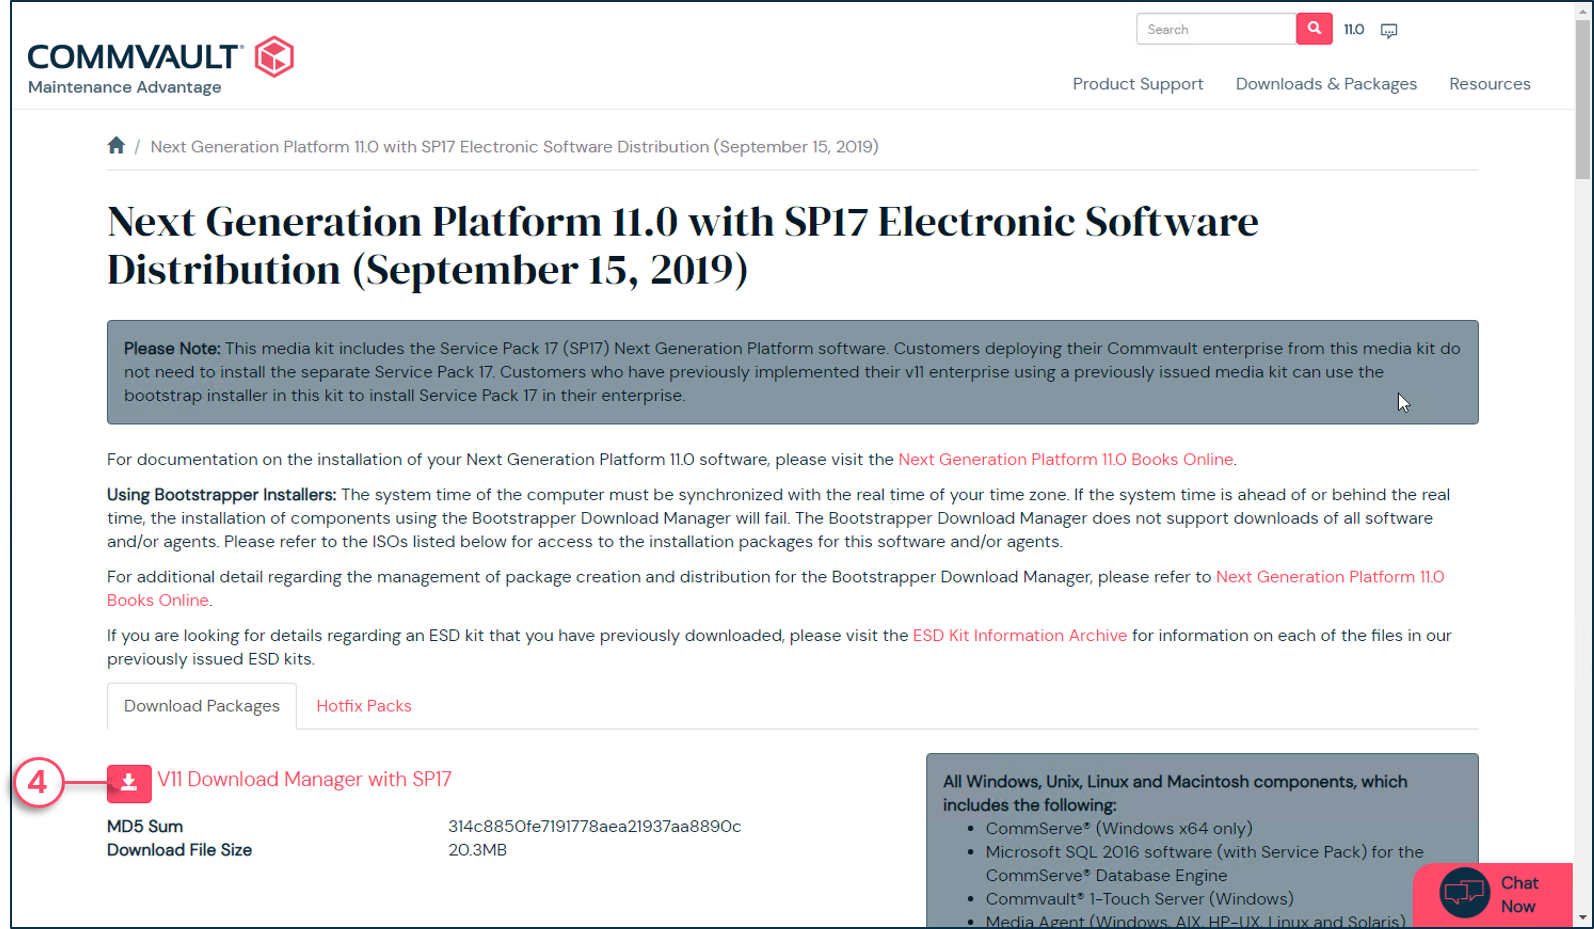
The installer media can also be downloaded from the Download Center on the Commvault® software Cloud Services website.
To learn more about the Commvault's Cloud Services, go to the following link: https://cloud.commvault.com/
CommServe® Server Installation
When deploying Commvault® software, it is important to note that every environment is different relative to the available infrastructure, technology, budget, culture and requirements of the organization. Whether performing a new installation, an upgrade, or expanding an existing environment, a good amount of planning should take place prior to installing Commvault software. The more emphasis put into planning, the more likely the deployment will go smoothly.
Gathering Information
Proper documentation of the CommCell components being installed is essential for a smooth deployment. The following chart provides a sample of the information that must be obtained for the CommServe deployment. Having this information in advance will not only help the deployment go quicker – it can help bring any shortcomings to the surface, such as a lacking resource. Furthermore, it can aid in verifying site readiness and serve as a template for post deployment documentation.
Chart showing critical information for the CommServe server installation
Attribute | Value (Examples) |
Additional Packages | File system agent, MediaAgent, Workflow engine, Web Server |
SQL Install Directory | Drive:\Program Files\Microsoft SQL Server| |
SQL Database Directory | Drive:\Commvault\Database| |
Commvault Software Directory | Drive:\Program Files\Commvault\ContentStore |
DR Share | \\DRCommserve\CSDR |
Software Cache | Drive:\Program Files\Commvault\ContentStore\Software |
CommServe® Server Installation Overview
The following steps are used to install the CommServe server:
- From the download location, launch Setup.exe.
- Select Accept on the license agreement screen.
- Choose Install Packages on this computer.
- In the Select Platforms window, select CommServe. Additional components can also be selected.
- The installation folder path is set by default to the operating system install drive, Program Files folder. The default location can be changed to a different location by clicking the Browse button and selecting the desired location.
- After the destination folder is selected, the summary of install options selected is displayed for confirmation.
- Review the install options and click Install to proceed with the installation. The CommServe® server installation now installs the Microsoft .NET Framework 4.0 and Microsoft Visual C++ redistributable packages for the selected platforms.
Configure CommServe® Database Settings
During the installation, the location for the CommServe database engine and database files must be selected. This location should follow the recommendations provided on Commvault's documentation site. The database must be located on a dedicated volume. A new CommServe database is created for new installations. The software also sets the SA password for the CommServe database. The password can be changed after the installation. Although not needed for day to day administration, it may be needed during troubleshooting or Disaster Recovery procedures.
The installation wizard also offers the opportunity to import an existing database. This function is useful when performing a hardware refresh, or when rebuilding a CommServe® server in a disaster scenario. When selecting the 'Use an Existing Database' option, browse to the location of the database export, and select the correct database. If there is an SA password mismatch, you must supply the customer defined password.
When configuring the CommServe Database, the following occurs during installation:
- The Microsoft SQL Server administrator password is set.
- The option for the database files folder path is shown during the SQL instance installation.
- A new CommServe database can be created or an existing database can be used. An existing database in the form of a CommServe database dump or export is used when:
- Installing the CommServe® server in an existing CommCell® environment when performing a server upgrade.
- Rebuilding a CommServe® server in a disaster scenario.
When selecting the 'Use an Existing Database' option, browse to the location of the database export, and select the correct database.
Configure Basic Console Options
Administrator Account
During the installation, an administrator account must be created. This account is used to log into the Commvault Command CenterTM and the CommCell® Console which is the primary user interfaces for configuration and administration tasks. The account cannot be deleted. A strong password should be used and be safely stored in the organization's secure password management system. After the installation, at least one other administrative account should be created for daily use. This is critical in disaster situations to rebuild and login to the environment to implement additional DR procedures. Other administrators and users can use Active Directory (AD) for logging in.
Even if Active Directory integration is used to authenticate users, it is strongly recommended to have at least two administrators with local administrative accounts for DR purposes.
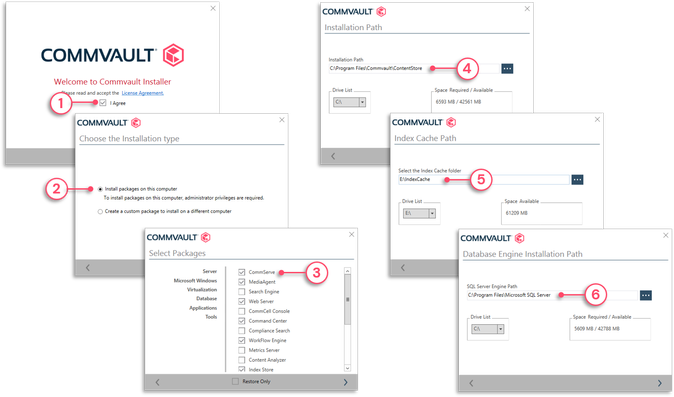
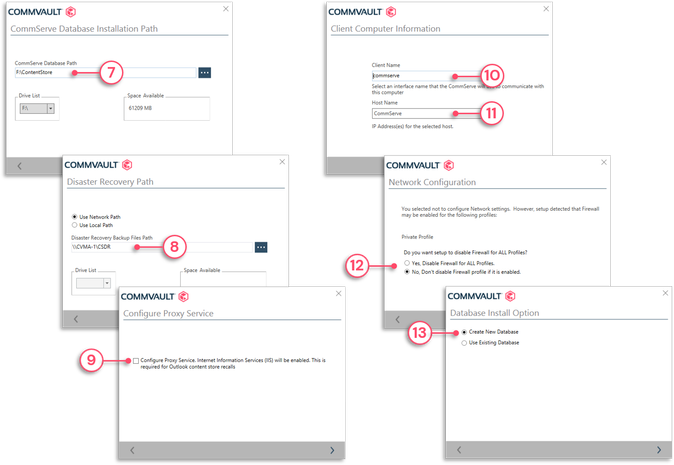
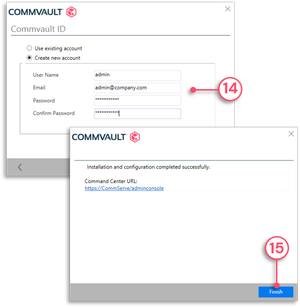
The CommServe® Server installation
1 - Accept the license agreement.
2 - Select to install packages on this computer.
3 - Select the CommServe package as well as any other required components.
4 - Define the installation directory for Commvault® software.
5 - If the MediaAgent package was also selected, provide the location for the Index Directory.
6 - Provide the location where the Microsoft SQL software will be installed.
7 - Select the folder in which the CommServe® Server database will be created. It is recommended to use a dedicated volume.
8 - Define the location to store the CommServeDR backup exports. It is recommended to use a network location, preferably offsite.
9 - If you plan on using email archiving, check to configure IIS for recalls.
10 - Define the CommServe® Server name as displayed in the GUI.
11 - Provide the host name to use to reach the CommServe® Server.
12 - If Windows Firewall is enabled, define if it must be disabled or not.
13 - During a new install, select Create New Database, or select Use Existing Database during a disaster recovery or staging scenario.
14 - Provide an email address and a password for the built-in admin account.
15 - Click Finish.
Software Cache Options
During the installation, the software packages and updates are copied to local disk. This is called a Software Cache or CommServe Cache and can be leveraged to "push" Client Agent software and updates to other servers in the environment. These settings can later be changed.
Cluster Setup Options
If the CommServe server is being installed in a cluster, log into the active node with an Administrative account and then run Setup.exe from the installation media. The Cluster Setup Install Option page is displayed during the installation. After completing the selections on the active node, it may be necessary to log into the remaining cluster nodes and repeat the installation process. The installation will apply the missing components to the cluster node.
Addressing Installation Issues
To assist in troubleshooting installation errors, check the following log:
%allusersprofile%\Commvault Systems\Galaxy\LogFiles\Install.log. If the error occurs after the summary page, check the installation logs in the Software_Installation_Directory\Log Files directory.
Copyright © 2021 Commvault | All Rights Reserved.