Commvault

Commvault® 3DFS Solution

Quick Links to Topics:

Credits:

Great thanks to Satish Kilaru and William Katcher for their technical expertise and great explanations!

The Commvault® 3DFS Solution Overview

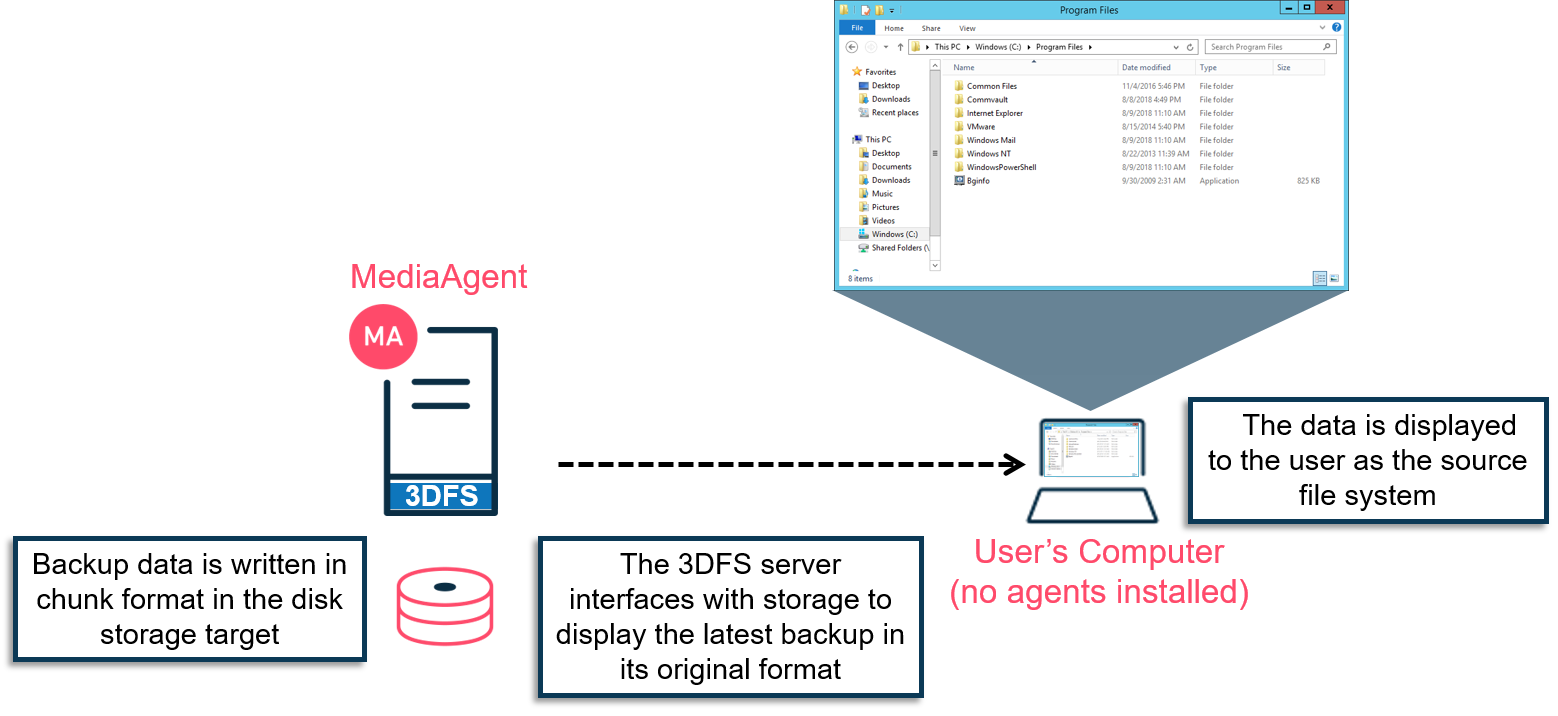
In an ideal world, any user who has lost data would be able to recover it quickly with an easy-to-use portal that avoids confusion. The design of the Commvault® WebConsole is entirely based on this easy-to-use principle. Even so, some users less experienced with backup software concepts would rather not log on to such a portal to restore data. Therefore, Commvault® software offers an ingenious alternative. With it, the most recent version of the backed up data is presented as Network File System (NFS) or Common Internet File System (CIFS) shares. This means you now have access to data while using your favorite client software, such as Windows File Explorer. 

The Commvault® 3DFS solution takes its name from the technology on which it is based: a 3DFS server. Once this component is configured and enabled, it serves as an interface to access data written in chunk format from Commvault® storage and presents it in its original form. This way you can copy any data using Windows Explorer, PowerShell or a command line. No agents or components require installation on your computer. 

NOTE: Only file system backups are currently supported by this function. Application agent backups are not.

Representation of the 3DFS solution


The 3DFS server can also be combined with the NFS-Ganesha component to provide an additional range of features. NFS-Ganesha, however, requires a MediaAgent on a Linux platform. 

Support matrix:

NFS serverSupportOperating system
NFS-Ganesha server + Samba
  • NFS v3
  • NFS v4
  • CIFS shares
  • Refresh on Backup feature
  • 3DFS ACLs
  • Share creation at the backup set level
Linux
3DFS server
  • NFS v3
  • Share creation at the backup set level
Windows and Linux


3DFS Solution Implementation

It is important to establish the needs for your environment. This dictates which NFS server to use, as well as the deployment steps. If the MediaAgent is a Windows server, only the 3DFS server can be used. However, a Linux MediaAgent will be able to use the NFS-Ganesha and Samba components. The deployment steps are as follows:

  • If not done already, install the MediaAgent (the 3DFS package is part of the MediaAgent installation)
  • If using the NFS-Ganesha server, install the NFS-Ganesha RPM
  • If using the NFS-Ganesha server, install the Samba RPM

Install the NFS-Ganesha RPM

The NFS-Ganesha RPM can be downloaded from the Download Center of the cloud.commvault.com website. Once downloaded, extract it:

[root@linuxma Downloads]# ls
Nfs-Ganesha_2.8.2_for_RHEL_7.tgz
[root@linuxma Downloads]# tar xf Nfs-Ganesha_2.8.2_for_RHEL_7.tgz

[root@linuxma Downloads]# ls
Nfs-Ganesha_2.8.2_for_RHEL_7.tgz Nfs-Ganesha_2.8.2_for_RHEL_7.tgz


Then, follow the instructions contained in the install.txt file to install the RPMs and dependencies. But first, validate that no other installation of NFS-Ganesha or dependencies currently exist on the server.

[root@linuxma Nfs-Ganesha_2.8.2_for_RHEL_7]# rpm -qa | grep ganesha
[root@linuxma Nfs-Ganesha_2.8.2_for_RHEL_7]#

[root@linuxma Nfs-Ganesha_2.8.2_for_RHEL_7]# rpm -qa | grep libntirpc
[root@linuxma Nfs-Ganesha_2.8.2_for_RHEL_7]#

[root@linuxma Nfs-Ganesha_2.8.2_for_RHEL_7]# yum install policycoreutils-python.x86_64
Complete!
[root@linuxma Nfs-Ganesha_2.8.2_for_RHEL_7]# yum install pyparsing
Complete!
[root@linuxma Nfs-Ganesha_2.8.2_for_RHEL_7]# yum install jemalloc
No package jemalloc available.
Error: Nothing to do


If you encounter that error, it means that the system can't find the required RPM. If so, simply install it:

[root@linuxma Nfs-Ganesha_2.8.2_for_RHEL_7]# rpm -i jemalloc-3.6.0-1.el7.x86_64.rpm


Then install the NFS-Ganesha RPMs:

[root@linuxma Nfs-Ganesha_2.8.2_for_RHEL_7]# rpm -i userspace-rcu-0.7.16-1.el7.x86_64.rpm

[root@linuxma Nfs-Ganesha_2.8.2_for_RHEL_7]# rpm -i libntirpc-1.8.0-0.1.el7.centos.x86_64.rpm
[root@linuxma Nfs-Ganesha_2.8.2_for_RHEL_7]# rpm -i nfs-ganesha-2.8.2-0.1.el7.centos.x86_64.rpm
[root@linuxma Nfs-Ganesha_2.8.2_for_RHEL_7]# rpm -i nfs-ganesha-utils-2.8.2-0.1.el7.centos.x86_64.rpm
[root@linuxma Nfs-Ganesha_2.8.2_for_RHEL_7]# rpm -qa | grep libntirpc
libntirpc-1.8.0-0.1.el7.centos.x86_64
[root@linuxma Nfs-Ganesha_2.8.2_for_RHEL_7]# rpm -qa | grep nfs-ganesha
nfs-ganesha-2.8.2-0.1.el7.centos.x86_64
nfs-ganesha-utils-2.8.2-0.1.el7.centos.x86_64


Installing Samba

If you plan on accessing the shares from Windows computer, Samba must be installed to allow the use of CIFS share instead of NFS. In order to do so, proceed as such:

[root@linuxma Nfs-Ganesha_2.8.2_for_RHEL_7]# yum install samba-client-libs samba-winbind samba samba-winbind-modules samba-common-libs samba-client samba-common samba-common-tools samba-libs tdb-tools ntp
Complete!


Manage 3DFS Shares

NFS shares are created to allow access to users. If Samba is installed with the NFS-Ganesha component, the CIFS shares are created automatically at the same time as the NFS shares, providing access with any of the two protocols.

Several important options must be defined in the wizard screens. They are as follows:

  • Share Name - The name of the share where users access data. The following displays an example of a share called MyShare

To mount the NFS share - Syntax is mount 3dnfs_server_host_name_or_IP_number:3dnfs_share_path 3dnfs_client_local_mount_path, so in this example: mount linuxma.company.com:MyShare MyRestoreFolder/test

To mount the CIFS share (requires NFS-Ganesha and Samba) - Syntax is mount //3dnfs_server_host_name_or_IP_number/3dnfs_share_path 3dnfs_client_local_mount_path -o user=<username>, dom=<domainname>, so in this example:  mount //linuxma.company.com/MyShare MyRestoreFolder/test -o user=JDoe, dom=company

  • Network Storage Server - The MediaAgent to use to publish the NFS share. If NFS-Ganesha and Samba are installed on the server, the equivalent CIFS share is also created.

  • Browse MA - The MediaAgent that is used as the Indexing Server. It is recommended to use the backup MediaAgent.

  • Copy Precedence - By default, the storage policy copy with a precedence of 1 is used to share data. In some scenarios, it may be beneficial to use a secondary copy. For instance, if a copy of the backup data is replicated to a secondary site, users from that site may prefer to browse the local copy to avoid an additional hop to reach the main site.

  • Show Deleted Items - Whether the latest backup or point-in-time is selected, the system displays the file system as it was during that backup. If files or folders were deleted prior to that displayed backup, they will not show up in the folder structure. In order to display those items, check the 'Show Deleted Items' checkbox.

  • Enable ACL - By default, every user has access to the entire backup data. Of course, in many scenarios, it may be preferable to restrict a user's access to the data they own or that they are allowed to see. To restrict access using ACLs, check the 'Enable ACL' checkbox. The use of ACLs requires some prerequisites explained later.

  • Refresh on Backup - This option requires the NFS-Ganesha component to be installed and therefore is supported only on the Linux MediaAgent. When checked, the displayed file system is refreshed with the latest information as soon as a new backup completes. The view displayed is always the latest backup, it cannot be a point-in-time view. To display a point-in-time view, uncheck this option.

  • Restore Time - When Refresh on Backup is deselected, a restore time must be provided. By default, the latest date and time is pre-populated, which results in a view displaying the latest backup. The date and time can be modified as needed. Note that when a time is set, the latest backup that ran before that set time is displayed.

  • Network Clients - Two options are available to define which computers are allowed to access the share:

    • All Clients -  This is the default option, which allows users to connect to the share from any computer. The user still has to authenticate, and the data displayed will meet ACL restrictions if the 'Enable ACL' option is selected.

    • Custom - This field allows access to specific computers. Simply type the hostname or IP address. Separate multiple hostnames or IP addresses with a comma (,). You can also specify a subnet mask in CIDR (Classless Inter-Domain Routing) notation. For example, to give network share access to all network clients that have IP addresses in 192.168.0.0 subnet, enter 192.16.0.0/16.


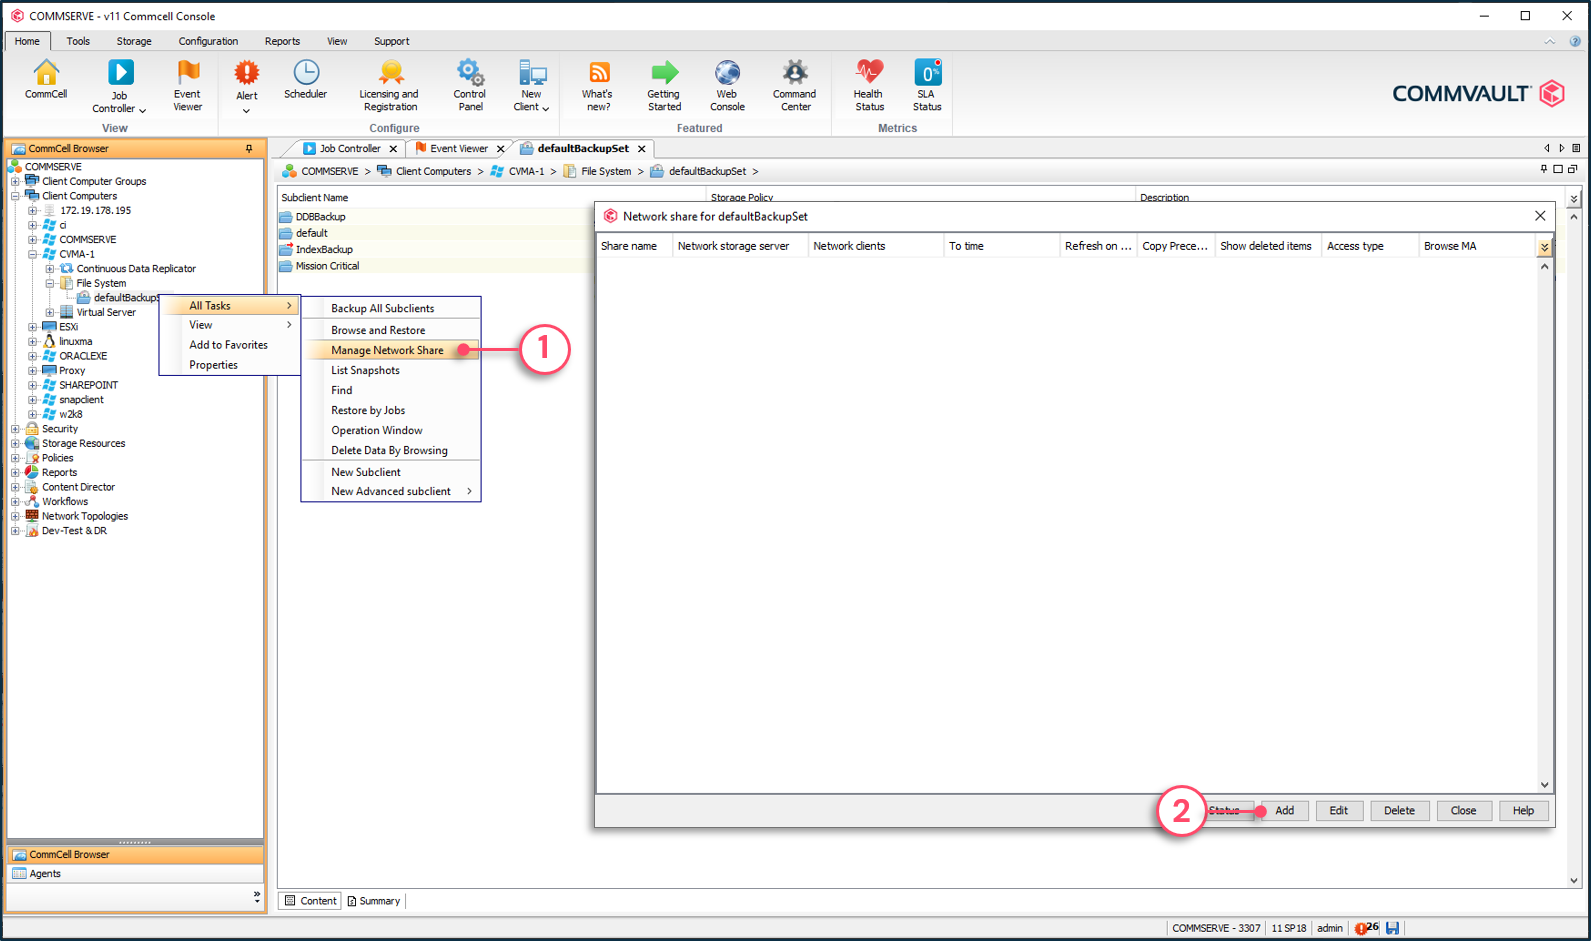
To add a network share

1 - Right-click the backup set or subclient for which backups must be shared | All Tasks | Manage Network Share.

2 - Click to Add a network share.


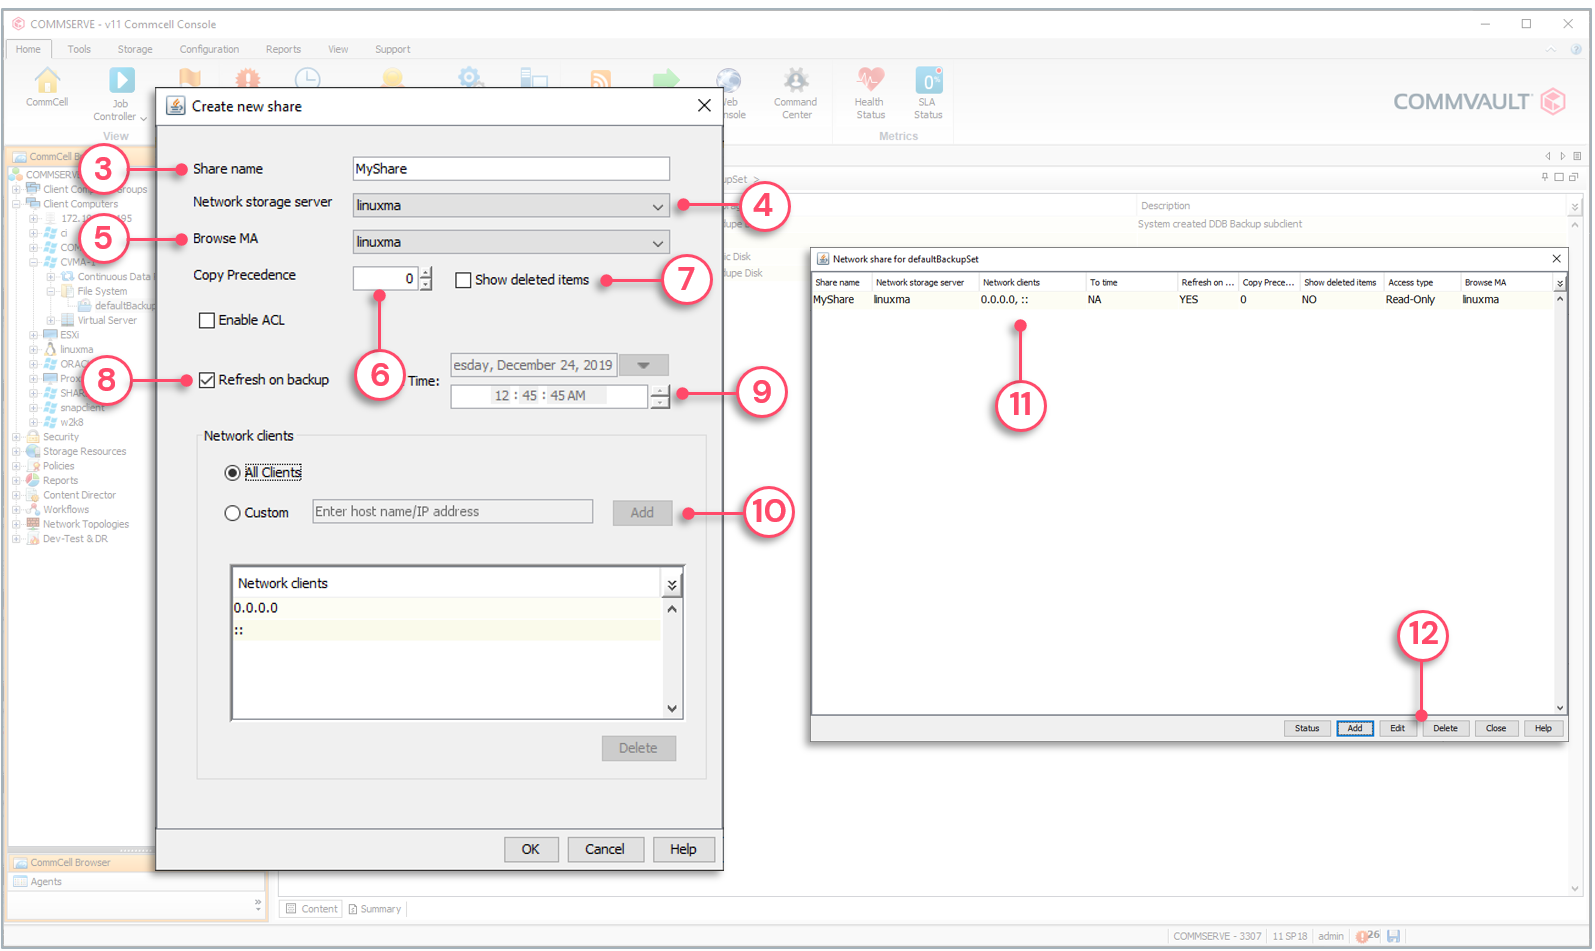
3 - Provide a descriptive name for the share.

4 - Select the MediaAgent used as 3DFS server.

5 - Select the MediaAgent containing the indexes.

6 - Select the Copy Precedence to use.

7 - Check to display items that were deleted before the latest backup.

8 - Check to display the latest backup only or uncheck to…

9 - …display the backup as of a specific date and time.

10 - Specify if any client or only specific clients can connect to the share.

11 - The share is listed for the subclient or BackupSet.

12 - Select the share and click to Edit or Delete it.


3DFS Share ACL-Based Access

During backups, security definitions (ACLs or Access Control Lists) are also captured along with the data. However, these definitions are not indexed by default and cannot be applied when a user accesses a 3DFS share. In order to take advantage of this security, it is possible to activate the indexing of these ACLs. To do this, simply check the 'Catalog ACL' option for the subclient used for backups. This option must be enabled before performing backups, otherwise the ACL definitions will not be indexed. In addition, the type of scan used during the backup must be modified to use the recursive type. Once these options are in place and backups are completed, users will only have access to the data they own or is shared with them.


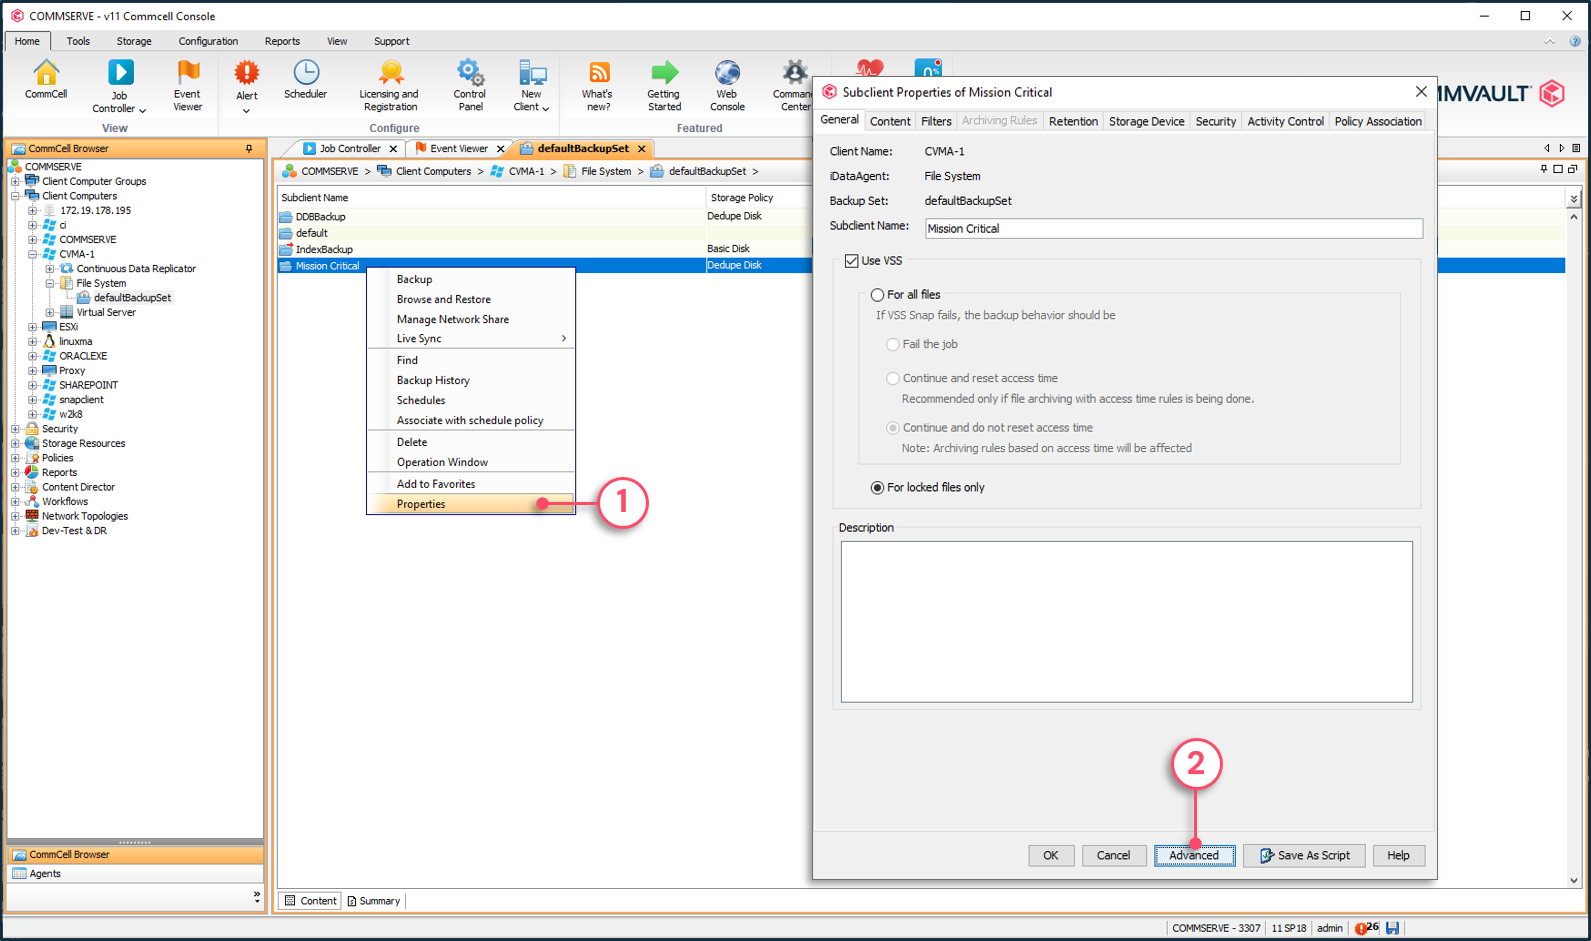
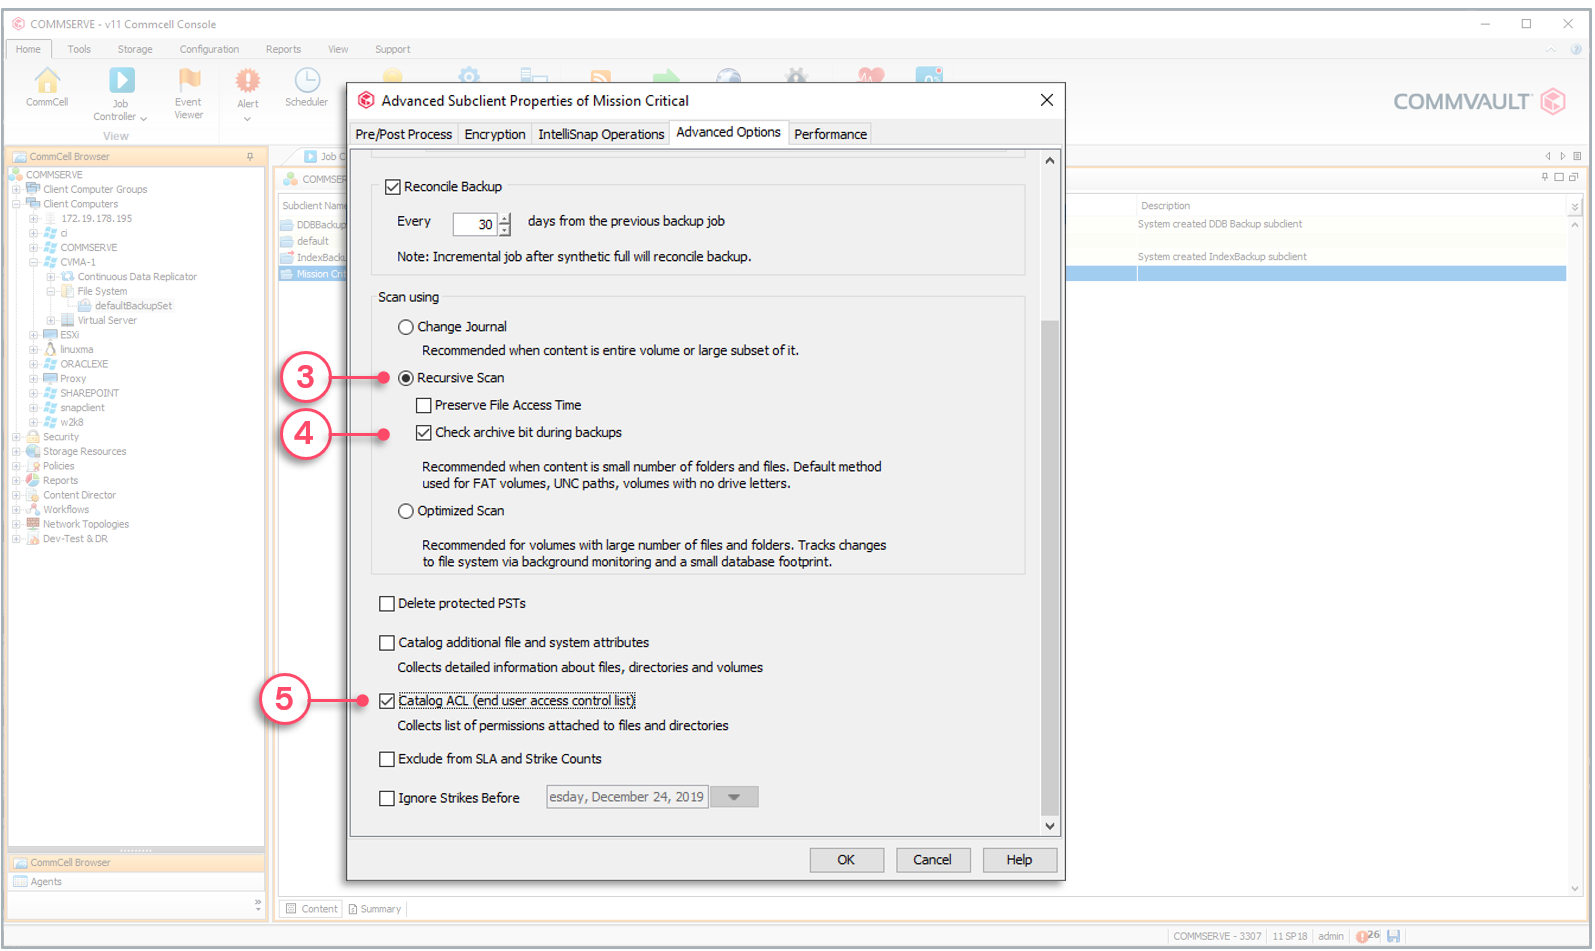
To catalog the ACLs during backups

1 - Right-click the subclient | Properties.

2 - Click to reach the Advanced options.


3 - Click the Recursive Scan radio button.

4 - Select the Check archive bit during backup box.

5 - Check to Catalog the ACLs during backups.


3DFS Server Cache

When the 3DFS server publishes a share, the mount point used to mount the volume on the server is located in the 'Job Results' directory by default. It is strongly recommended to move it. When updating the Commvault® software, the share could become inaccessible, which is not the case if the cache of the 3DFS server is moved to another place.

Set the location of the 3DFS cache from the MediaAgent's NFS Server properties page tab.


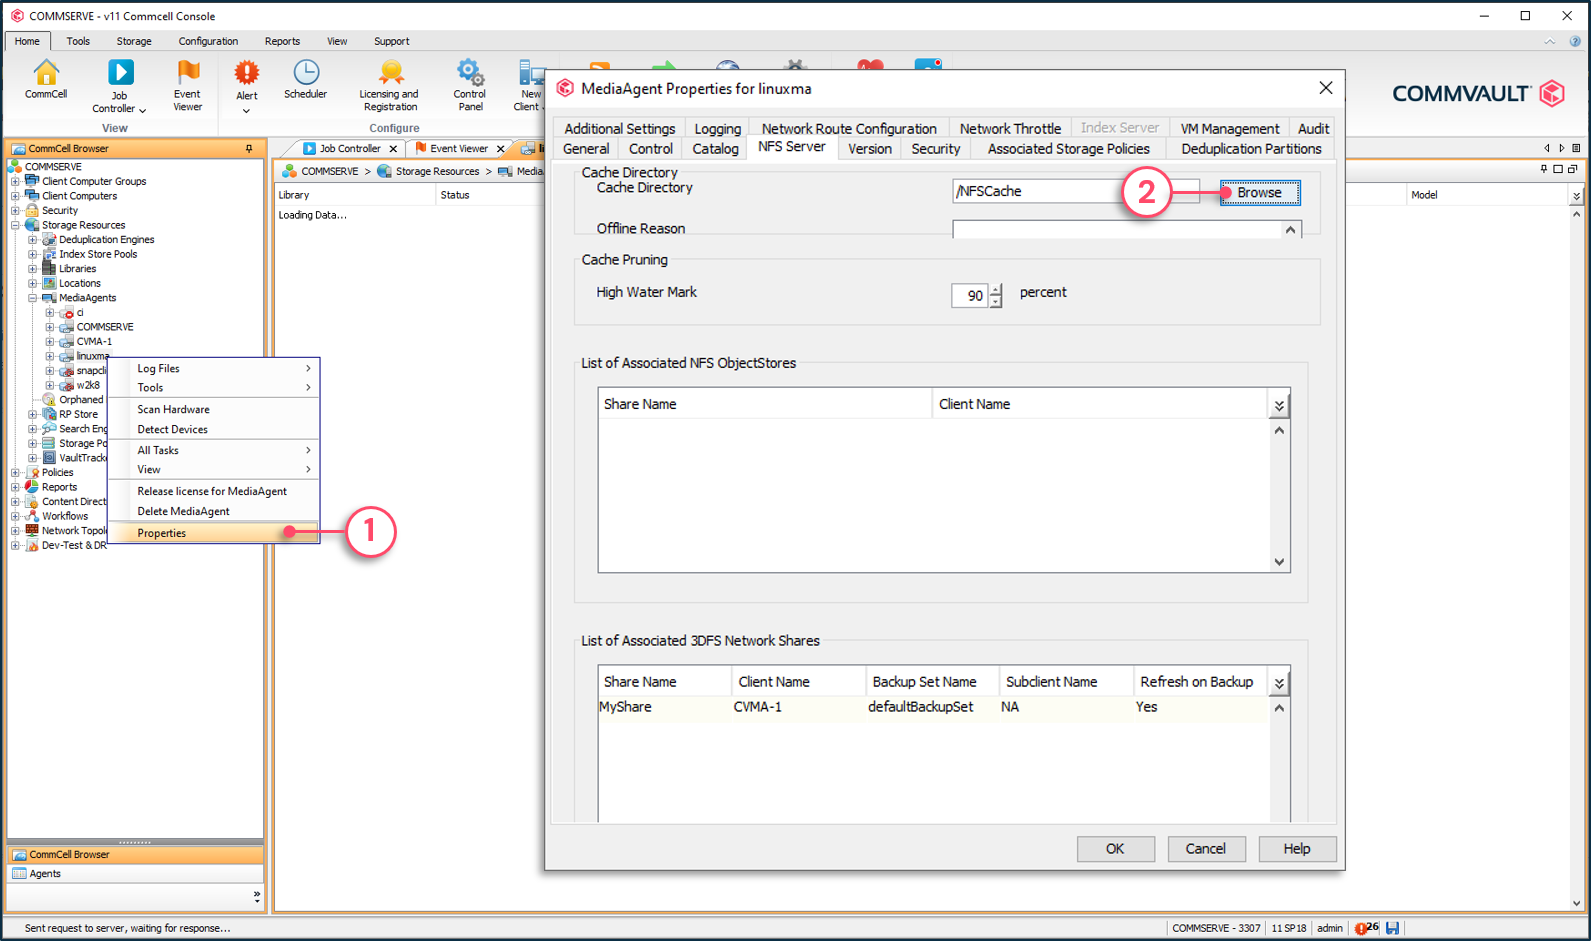
To define the 3DFS server cache

1 - Right-click the MediaAgent used as the 3DFS server | Properties.

2 - Browse to the location to use as cache.


Copyright © 2021 Commvault | All Rights Reserved.